How a Fiberglass Pool Shell Is Installed (Step-by-Step)
Introduction
Welcome to “How a Fiberglass Pool Shell Is Installed (Step-by-Step),” your comprehensive educational resource for understanding what goes into transforming a backyard with a beautiful and long-lasting fiberglass pool.
Calmwater Pools helps homeowners in Maryland, Washington DC, Northern Virginia, and nearby West Virginia select the right fiberglass pool model, coordinates procurement of the shell, and arranges delivery to your project site. Installation is performed exclusively by qualified independent contractors hired directly by the homeowner. This guide is intended to help you understand the full installation process so you can work confidently with your contractors from start to finish.
Fiberglass pools are renowned for their durability, ease of maintenance, and efficient installation process. Unlike traditional concrete pools, a fiberglass pool shell comes pre-formed and ready to install, making it an excellent choice for homeowners who want a quality result with a streamlined build timeline.
Explore our Fiberglass Pool Shells and Custom Pool Shells to find the right size and shape before your project begins.
Choosing a fiberglass pool is an investment in a cost-effective solution that increases the value of your property. Fiberglass pool benefits include a smooth, non-abrasive surface, reduced chemical usage, and minimal ongoing maintenance, ensuring that your pool remains a pristine oasis for years to come.
Learn more about our complete line of Fiberglass Pools.
This guide will walk you through every stage of the installation process—from planning and excavation through plumbing, backfilling, and finishing—so you and your contractors are aligned on what a successful installation looks like.


Efficient Installation of Fiberglass Pool Shells
Choosing a fiberglass pool shell is a practical and cost-effective decision, particularly when working with a trusted source for shell procurement and delivery. Fiberglass pool shells manufactured by Latham Pool Products are celebrated for their streamlined installation, which qualified independent contractors can often complete within a very short project window. The design of these shells simplifies the process considerably, as they come pre-molded with steps and seating areas already formed. Before installation begins, your contractor will select the appropriate backfill material—typically clean angular gravel—which supports the shell evenly and accommodates natural ground movement without shifting. This ensures the long-term stability and longevity of your inground fiberglass pool.
Creating a Personal Oasis with a Fiberglass Pool
A fiberglass pool installation elevates your backyard into a lasting retreat. The process involves meticulous planning and preparation by your qualified independent contractors, resulting in a durable and aesthetically pleasing addition to your home. Fiberglass pool shells manufactured by Latham Pool Products are engineered for a straightforward fit, which simplifies everything from positioning the shell to completing the plumbing and final backfill. The finished product brings endless hours of enjoyment and relaxation. Furthermore, inground fiberglass pools require less maintenance than traditional concrete pools, making them an excellent long-term choice for homeowners.
For homeowners in Maryland, Washington DC, Northern Virginia, and nearby West Virginia, Calmwater Pools is your local resource for selecting the correct fiberglass pool model, coordinating shell procurement, and arranging delivery to your project site. Installation is handled exclusively by qualified independent contractors engaged directly by the homeowner. A standard project includes the pre-formed fiberglass pool shell manufactured by Latham Pool Products, which has transformed inground pool installations by enabling a streamlined build timeline. Once the shell is set in place, pool equipment such as pumps and filters can be connected by your licensed contractors. Whether you’re planning a large inground pool for the whole family or a more intimate design, the variety of available shell models offers endless possibilities to customize your outdoor space.
Table of Contents
Introduction
- Overview of the benefits of fiberglass pools
- Brief explanation of the installation process
Preparation
- Assessing your backyard for a fiberglass pool installation
- Checking zoning laws and obtaining permits
- Tools and equipment needed (e.g., 16 metric ton excavator, rubber track loader)
- Importance of having a clear plan (e.g., manufacturer dig sheet)
Site Preparation
- How contractors prepare the site for installation
- Checking the level of grade
- Removing obstacles (e.g., stumps) and disposing of them properly
- Setting corner stakes and marking the area for excavation
Excavation
- Step-by-step guide to excavating the site
- Using an excavator with a 28′ reach for difficult accesses
- Continually checking and adjusting the excavation depth and dimensions
- Tips for efficient and safe excavation
Preparing the Base
- How contractors prepare the base for the pool shell
- Importance of a solid and level base (using gravel and stone)
- Installing non-perforated pipes for drainage
- Screeding the area to ensure it’s perfectly level
Installing the Pool Shell
- Detailed steps for setting the pool shell in place
- Attaching the shell to the excavator with chains and a spreader bar
- Carefully positioning and lowering the shell into the excavated hole
- Checking for level and making adjustments as necessary
Plumbing and Backfilling
- Guide to installing plumbing and backfilling around the pool
- Starting plumbing with the heater and extending to skimmers and returns
- Proper backfill material and techniques for stability and drainage
- Ensuring the pool walls are supported during backfilling
Finishing Touches
- Final steps to complete the pool installation
- Installing additional features (e.g., lights, skimmers, equipment pads)
- Filling the pool with water and checking for leaks
- Landscaping and decking ideas to enhance your new pool area
Maintenance Tips
- Basic maintenance tips for your new fiberglass pool
- Regular cleaning and chemical balance
- Seasonal maintenance advice
- Protecting your pool during colder months with Inground Pool Winter Safety Covers
Conclusion
- Recap of the steps covered
- How Calmwater Pools supports your project from model selection through delivery
Full Guide: Table of Contents
- Why Choose a Fiberglass Pool?
- How Fiberglass Pool Shells Work
- How Calmwater Pools Helps You Select, Procure & Receive Your Shell
- Planning & Design Considerations
- Understanding Permits and Local Requirements
- Site Preparation: Clearing, Leveling, and Marking
- Using Heavy Equipment Safely and Efficiently
- Excavation: Digging the Pool with Precision
- Building the Base: Creating a Solid Foundation
- Installing the Pool Shell: Setting Your Oasis
- Backfilling and Structural Support
- Plumbing Layout and Best Practices
- Equipment Pad, System Setup & Equipment Selection
- Finishing Touches: Decks, Coping, Lighting & Landscaping
- Maintenance & Care: Keeping Your Pool in Top Shape
- Cost & Budgeting Considerations
- Why Work With Calmwater Pools for Shell Selection & Procurement
- Common Installation Mistakes (and How to Avoid Them)
- Sample Timeline for Installation
- Frequently Asked Questions
- Quick Checklists & Final Thoughts
1. Why Choose a Fiberglass Pool?
Fiberglass pools are especially popular because the hardest construction work is already done at the factory. The shell arrives as a one-piece unit with smooth gelcoat surfaces, built-in steps, benches, and often tanning ledges. Your qualified contractor’s job is to:
- Prepare the site
- Dig the hole
- Create a level base
- Place the shell
- Backfill and plumb the pool
- Add finishing touches like decks and landscaping
Compared with a traditional concrete pool, which requires forming, rebar, and long cure times, fiberglass pool installation is significantly faster. Qualified contractors can often complete the core installation in a matter of days when the project is carefully planned and all necessary equipment is ready.
Fiberglass pools also tend to carry lower long-term maintenance costs, which means your budget goes further on a larger pool, nicer decking, or premium features like lighting, heating, or an automatic safety cover.
Learn more about our complete line of Fiberglass Pools.
2. How Fiberglass Pool Shells Work
A fiberglass pool shell is a pre-formed, factory-molded structure manufactured by Latham Pool Products from layers of fiberglass and resin with a gelcoat surface. This design offers several key advantages:
- Structural Flexibility: It can flex slightly with soil movement, reducing the risk of cracking.
- Smooth Surface: No rough plaster—great for kids’ feet and easier on swimsuits.
- Low Chemical Demand: The non-porous surface helps prevent algae from embedding.
- Built-in Features: Steps, benches, sun ledges, and light niches are molded in.
Because the shell arrives ready to install, contractors spend less time building and more time placing, plumbing, and protecting your investment.
3. How Calmwater Pools Helps You Select, Procure & Receive Your Shell
Before a single shovel breaks ground, one of the most consequential decisions you’ll make is choosing the right fiberglass pool shell. The model you select determines not just the look and feel of your finished pool, but also how well it fits your yard, how smoothly the installation proceeds, and how much you’ll enjoy it for decades to come. This is where Calmwater Pools plays a direct and meaningful role.
Calmwater Pools serves homeowners in Maryland, Washington DC, Northern Virginia, and nearby West Virginia, helping them navigate fiberglass pool shell selection, procurement, and delivery coordination from start to finish. Installation is performed exclusively by qualified independent contractors hired directly by the homeowner. What we do is make sure the right shell arrives at the right place at the right time, and that you fully understand what you’re buying before you commit.
The Shell Selection Process
Fiberglass pool shells come in a wide range of shapes, sizes, depths, and configurations. Choosing the wrong model—one that’s too large for your yard, too shallow for your household’s needs, or incompatible with your site’s soil and grade conditions—can create real problems down the line. The shell selection process with Calmwater Pools is designed to eliminate that risk.
The process typically involves:
- A site and lifestyle assessment: We discuss your yard dimensions, sun orientation, household usage patterns, and aesthetic goals to narrow down which shell configurations make sense for your project.
- Model review: We walk through available fiberglass pool shell models—manufactured by Latham Pool Products—covering dimensions, depth profiles, built-in features (steps, benches, tanning ledges, light niches), and gelcoat color options.
- Fit confirmation: Before finalizing a selection, we help you verify that the model you’re considering will physically fit your excavation footprint, accommodate your contractor’s equipment, and work with your intended deck and coping layout.
- Dig sheet review: Every shell comes with a manufacturer-provided dig sheet specifying exact excavation dimensions. We make sure you understand the dig sheet and that your contractor receives it before any ground is broken.
Coordinating Procurement
Once you’ve selected your shell, Calmwater Pools coordinates the procurement process on your behalf. This means working through the supply chain to confirm availability, lead times, and logistics—so you’re not left guessing when your shell will be ready or scrambling to fill gaps in your contractor’s schedule.
- Availability confirmation: Fiberglass pool shells are manufactured to order or pulled from regional inventory. We confirm availability for your chosen model and color before you finalize your plans.
- Lead time planning: Procurement lead times vary by model and season. We communicate realistic timelines upfront so your contractor scheduling, excavation, and base preparation can be sequenced properly.
- Order coordination: We manage the order process and keep you informed at each stage, from placement through readiness for delivery.
Coordinating Delivery to Your Project Site
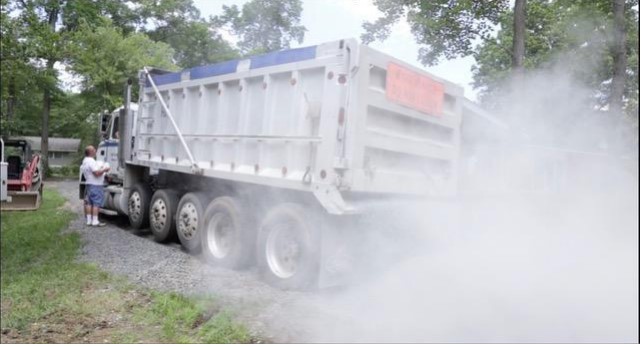
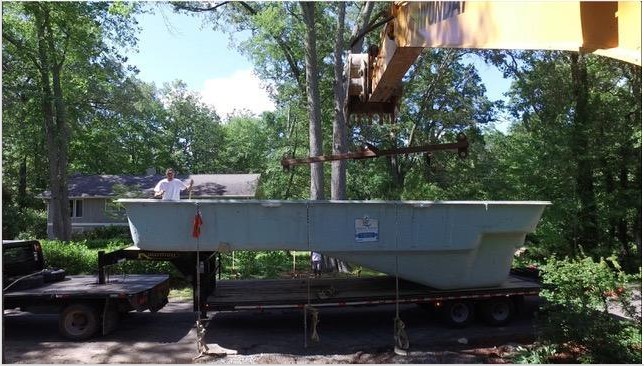
Delivering a fiberglass pool shell is not like receiving a standard freight shipment. These shells are large, one-piece structures—often 12 to 40 feet in length—that require specialized transport equipment and careful site logistics. A poorly coordinated delivery can result in a shell that can’t be offloaded, a truck that can’t access the site, or a schedule mismatch that leaves your excavation sitting open for days longer than necessary.
- Access planning: We work with you to confirm that delivery vehicles can reach your property and navigate to the installation site. This includes accounting for overhead obstructions, tight turns, gate widths, and road weight limits.
- Timing coordination: Delivery is scheduled to align with your excavation and base preparation, so the shell arrives when your contractor is ready to set it—not before or after.
- Communication with your contractor: We communicate delivery windows to your installation contractor so they can have the appropriate rigging equipment and crew on-site and ready.
- On-delivery support: We remain available on delivery day to address any questions or issues that arise during the handoff.
What Happens After Delivery
Once the shell is on your property and confirmed in good condition, Calmwater Pools’ direct role in the project is complete. From that point forward, all excavation, shell setting, plumbing, electrical work, backfilling, and finishing is the responsibility of qualified independent contractors hired directly by the homeowner. We’re always available to answer questions about the shell itself—its specifications, warranty, or manufacturer documentation—but the physical installation work belongs entirely to your contractors.
This clear division of roles means you always know who to call and for what. Calmwater Pools handles the shell. Your contractors handle the build.
4. Planning & Design Considerations
Before any dirt is moved, time should be spent planning the overall layout of the backyard. Consider the space where the pool will be located and evaluate:
- Sun exposure: Pools are more enjoyable when they receive good sunlight during the day. Observe how the sun moves across the yard and position the shell where it will get the most use and warmth. South and west-facing areas get more sun, which can help naturally warm the water.
- Privacy: Think about sightlines from neighbors’ windows or from the street. This is the time to plan for privacy fencing, hedges, or decorative screens.
- Access for machinery: Equipment such as a 16 metric ton excavator with a 28′ reach and a rubber track loader with a 68″ bucket require a clear access path into the yard. This may mean temporarily removing a fence panel or gate.
- Future features: Visualize where the pool equipment pad, deck, patio furniture, outdoor kitchen, or pergola might go. Leaving enough space now prevents frustrations later.
- Slope and soil: Know whether you’re dealing with clay, sand, or loam, and note any significant grade changes.
- Proximity to trees: Root systems and leaf debris are long-term problems. Pool placement decisions made here are expensive to reverse once the hole is dug.
Taking photos and sketching a simple overhead layout can help communicate clearly with contractors and vendors. When combined with the manufacturer’s dig sheet and any engineered drawings, this creates a clear roadmap that keeps the project organized.
Study the Dig Sheet
The manufacturer provides a dig sheet that serves as the blueprint for excavation. It includes:
- Exact length, width, and depth
- Slope and profile of the floor
- Radius corners and transitions
- Hash marks and depth references for the operator
Experienced contractors check and update excavation progress using the dig sheet and painted hash marks, ensuring the hole matches the shell’s shape and depth precisely.
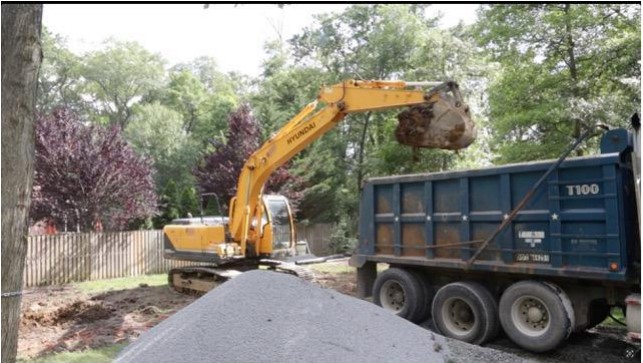
Plan for Soil Disposal & Schedule
Excavation produces a substantial amount of soil. Plan ahead:
- Where will dump trucks load?
- Where can they turn around?
- Are there overhead obstructions (trees, wires)?
- Will you arrange a haul-away service, or use the excavated material to regrade other areas of your yard?
Also, schedule your pool delivery to align with excavation and base preparation, so the shell can be set shortly after the base is ready.
5. Understanding Permits and Local Requirements
Every region has its own rules for pool installation. Before work begins:
- Contact your local building department to ask about pool permits, inspections, and safety requirements. Most localities require building permits for inground pools, electrical permits for pumps, lights, and heaters, and approved safety barriers or fences.
- Confirm setback requirements, which determine how close the pool can be to property lines, structures, and utilities.
- Ask about barriers and fencing—many jurisdictions require specific fence heights, self-closing gates, and sometimes alarms on doors leading to the pool area.
- Call 811 before any excavation begins. This is the national “Call Before You Dig” number and is not optional. Striking a buried utility line is dangerous and expensive. The location of gas, electric, water, and sewer lines must be confirmed before excavation starts.
Skipping this step can result in fines, forced removal, or difficulty selling your home later. Ensuring the project is fully compliant from the start saves homeowners from expensive corrections later and ensures the pool area is safe and legal.
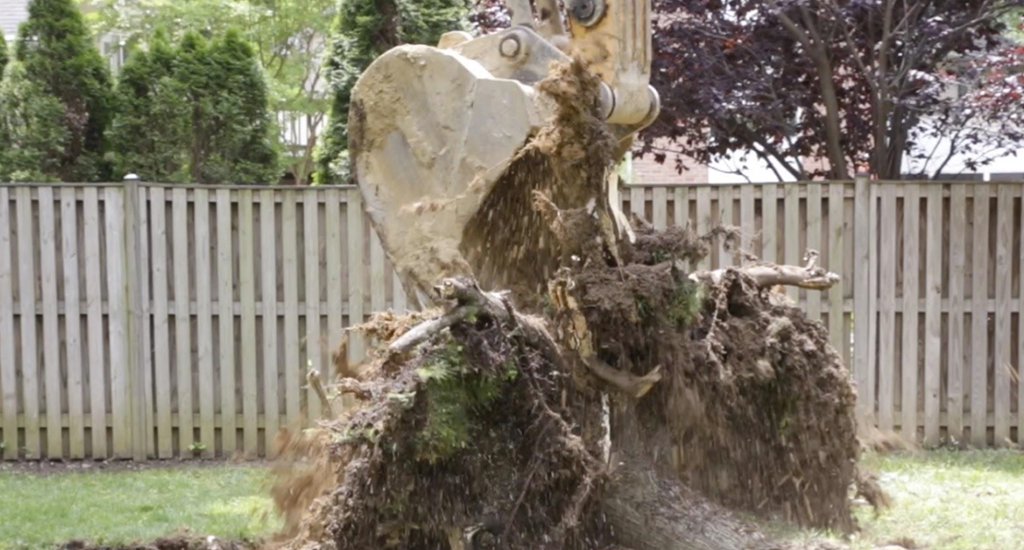
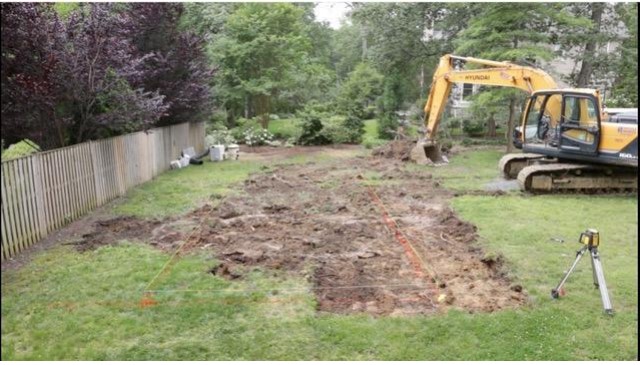
6. Site Preparation: Clearing, Leveling, and Marking
When contractors check the level of grade to set height for pool shell, they are establishing the finished height of the pool in relation to the rest of the yard and any planned decking. This is a crucial step.
Clear the Area
Remove:
- Trees and shrubs
- Rocks and surface debris
- Stumps — cut to 3–4 feet high for easier machine removal. Having the tree vendor leave the stump at 3–4′ height gives equipment something to grab onto, making removal much easier.
Stumps and large debris can be loaded into a dump truck or dumpster for disposal. Many homeowners arrange for a haul-away service for excavated material, while others use it to regrade other areas of their yard — a useful option if your property has low spots or uneven terrain.
Rough Grade & Establish Finished Height
Use a laser level or transit to determine the finished height of the pool:
- Consider the height of future decking and coping
- Factor in any automatic cover systems
- Ensure drainage and slope away from the pool so water does not pool around the shell or the home’s foundation
- Make sure the pool fits harmoniously into existing landscaping
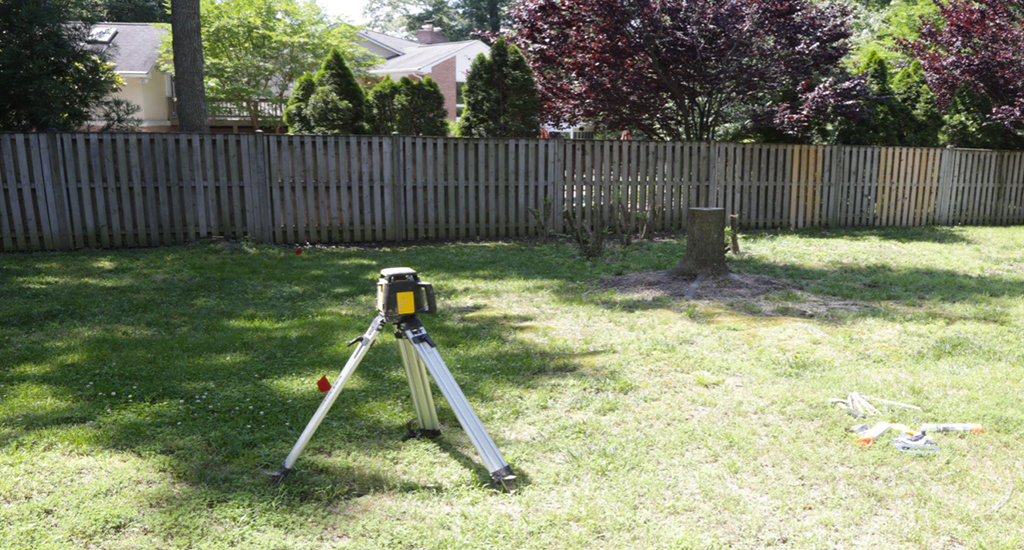
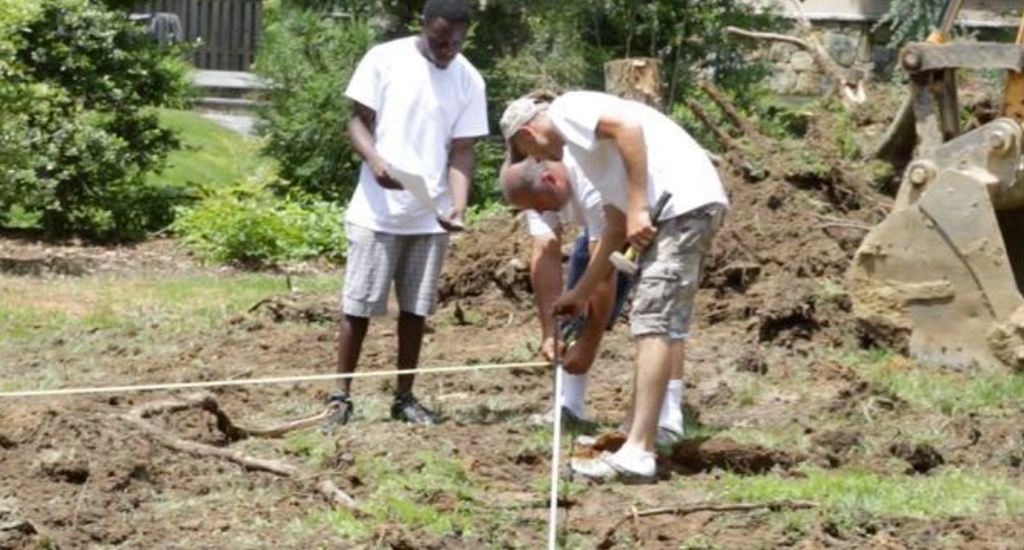
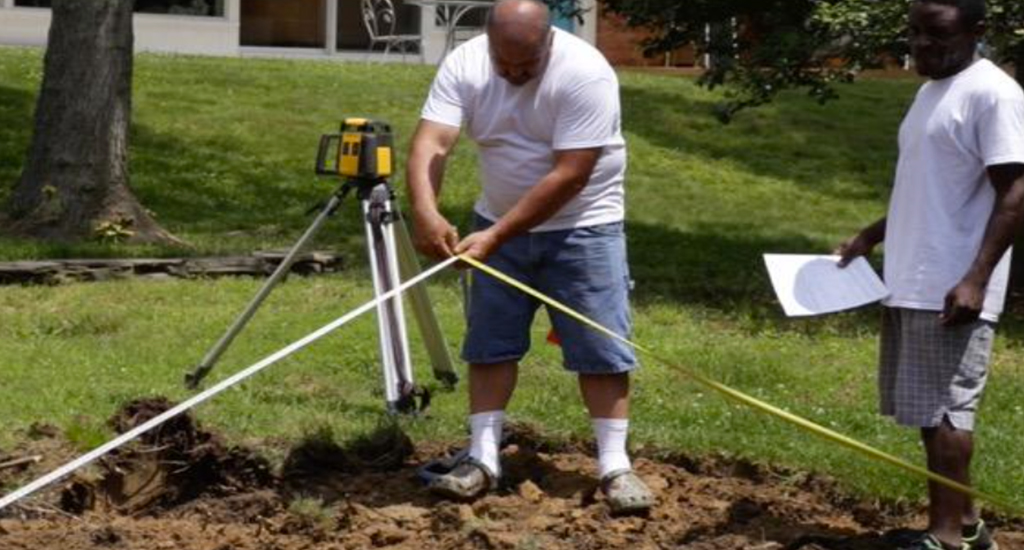
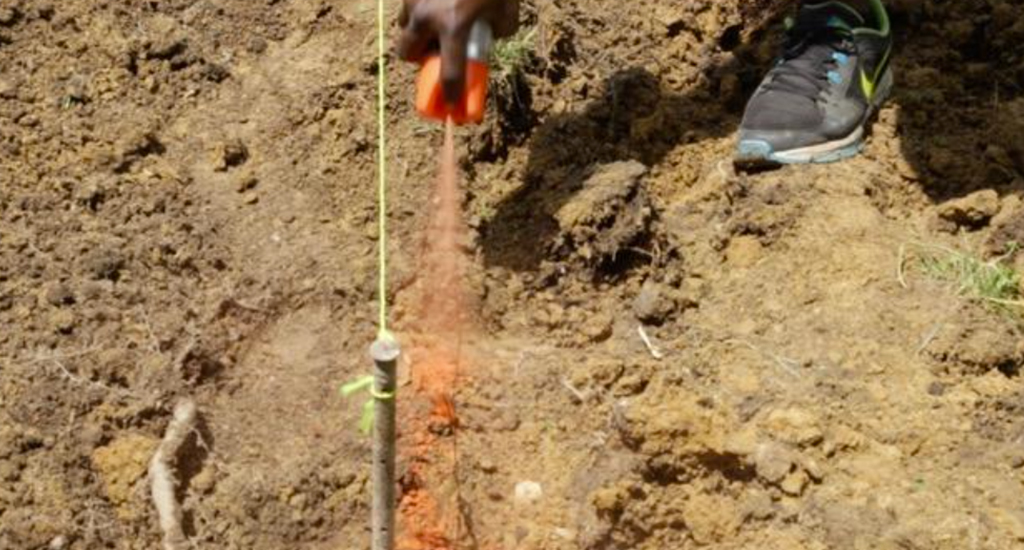
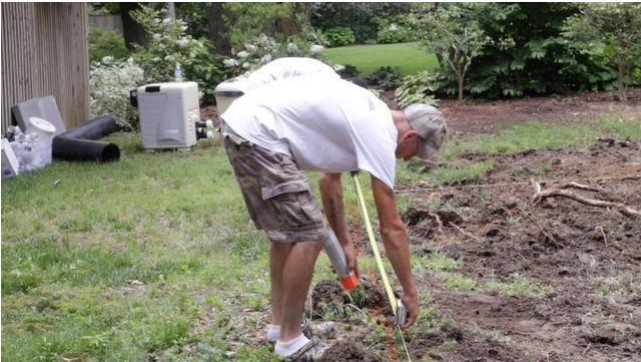
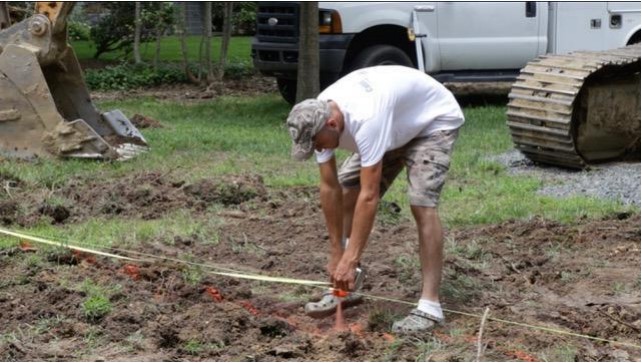
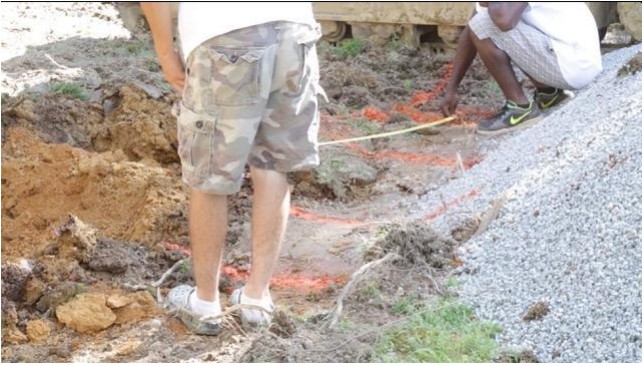
Set Corner Stakes & Square the Layout
- Install stakes at the four corners of the planned pool.
- Run string lines between them to form a rectangle.
- Measure diagonals to ensure the layout is perfectly square.
- Adjust stakes as needed until the layout matches the dig sheet dimensions.
Taking extra time to double-check measurements and diagonals ensures the pool will sit correctly in its final position and that coping and decking will look even and professional.
Mark the Excavation
Using spray paint:
- Trace the outer perimeter of the dig
- Mark hash lines corresponding to dig sheet elevations
- Highlight centerlines or key features if needed
These visual guides make it much easier for the excavator operator to dig quickly and accurately.
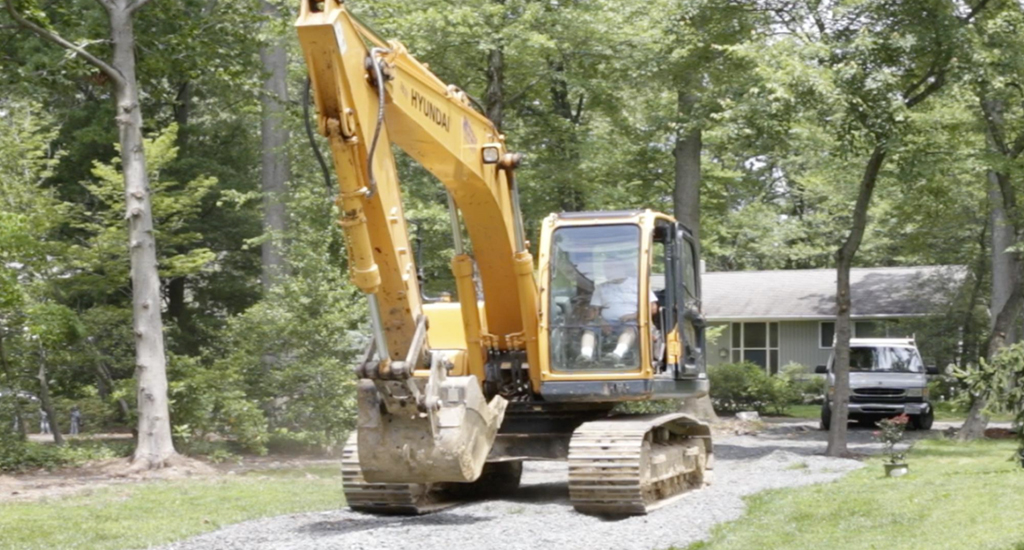
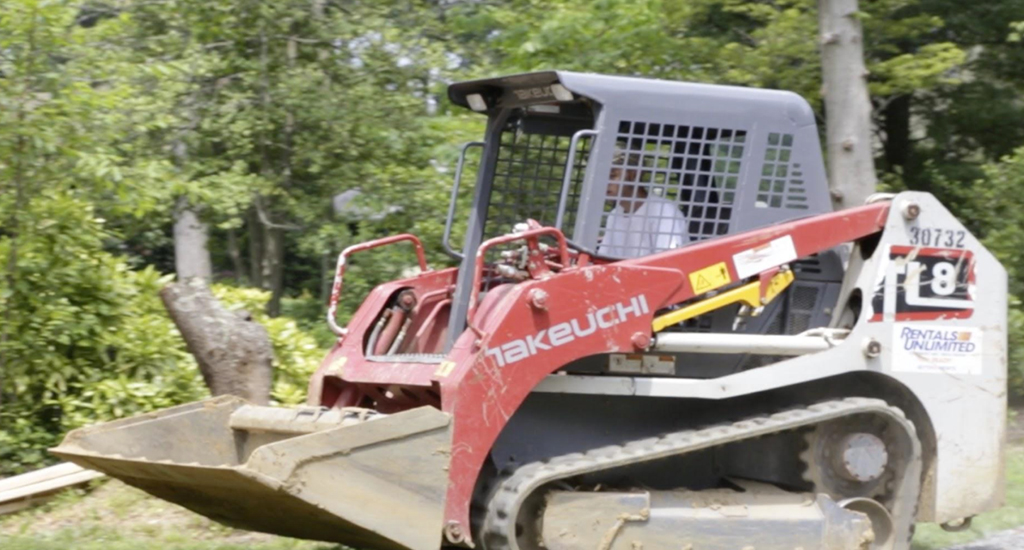
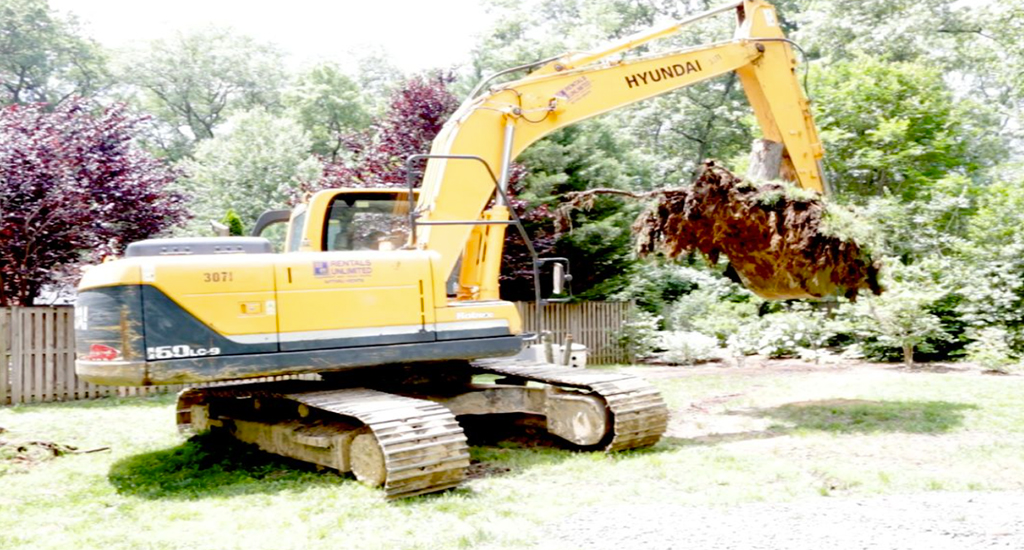
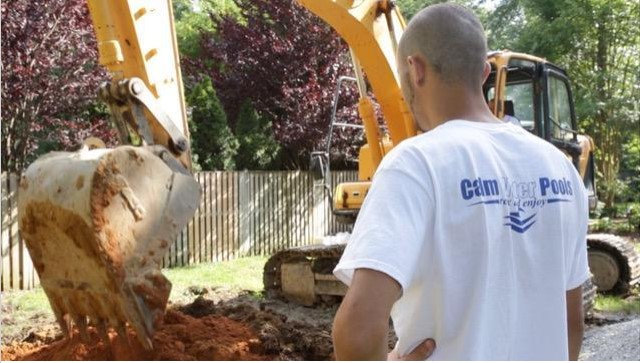
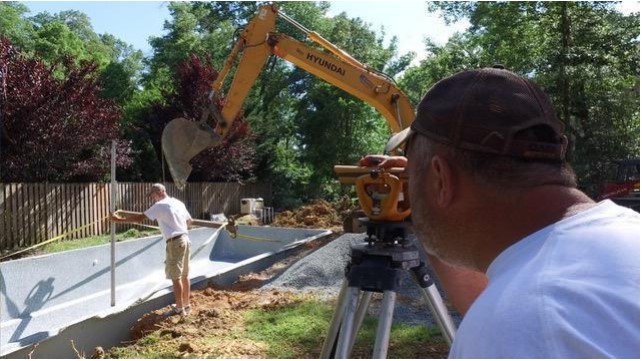
7. Using Heavy Equipment Safely and Efficiently
The equipment involved—a 16 metric ton excavator with a 28′ reach and a rubber track loader with a 68″ bucket—is what allows contractors to move large volumes of soil and heavy materials safely.
- Operator experience matters. Licensed excavation contractors should be engaged for the excavation and pool set phases to ensure safe and precise work.
- Dump truck and dumpster placement should be planned so that excavated soil and stumps can be removed without blocking site access. Loading excavated dirt directly into dump trucks is a clean and efficient method that prevents large soil piles from dominating the yard.
- Job site organization is important. Designated areas for base stone, backfill material, and equipment pads reduce unnecessary material handling.
When contractors mark the hash marks for the excavator per dig sheet, they are creating depth and contour guides that keep the excavation accurate and matched to the shape and stepped depths specified. Constantly updating these hash marks during excavation reduces the chance of over-digging, which would require additional stone and time to correct.
Always locate underground utilities before digging. Keep people and pets away from the equipment and excavation edge. Be mindful of soil conditions—wet or sandy soils can collapse and need shoring or stepped cuts.
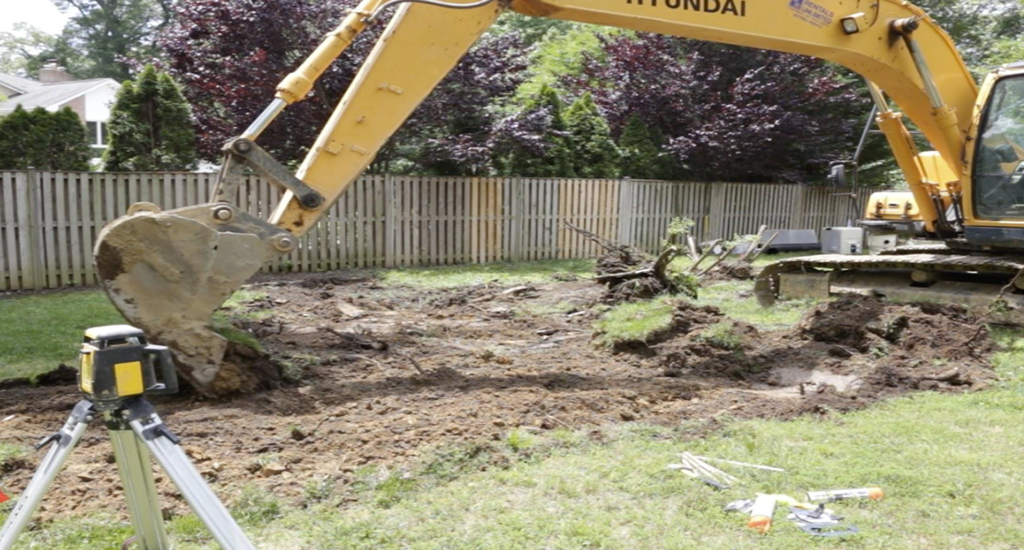
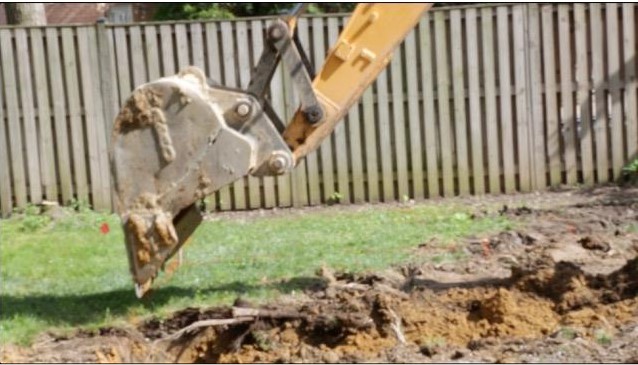
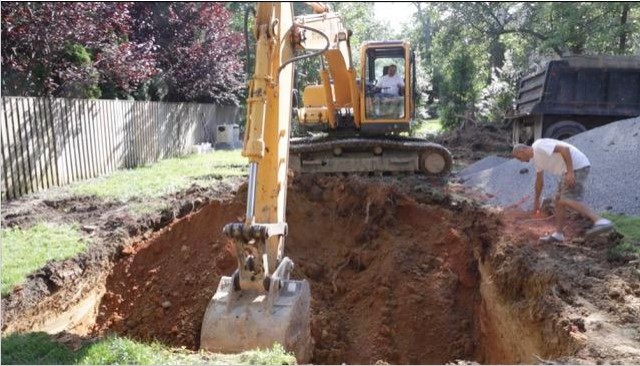
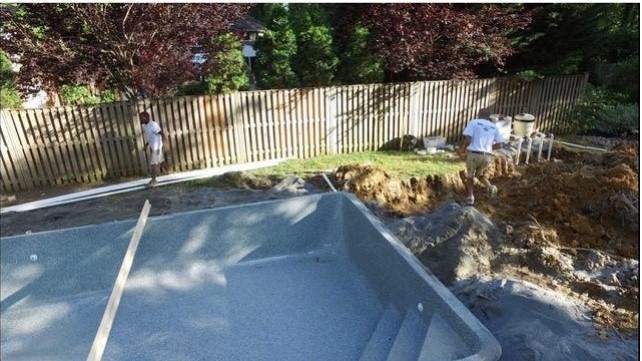
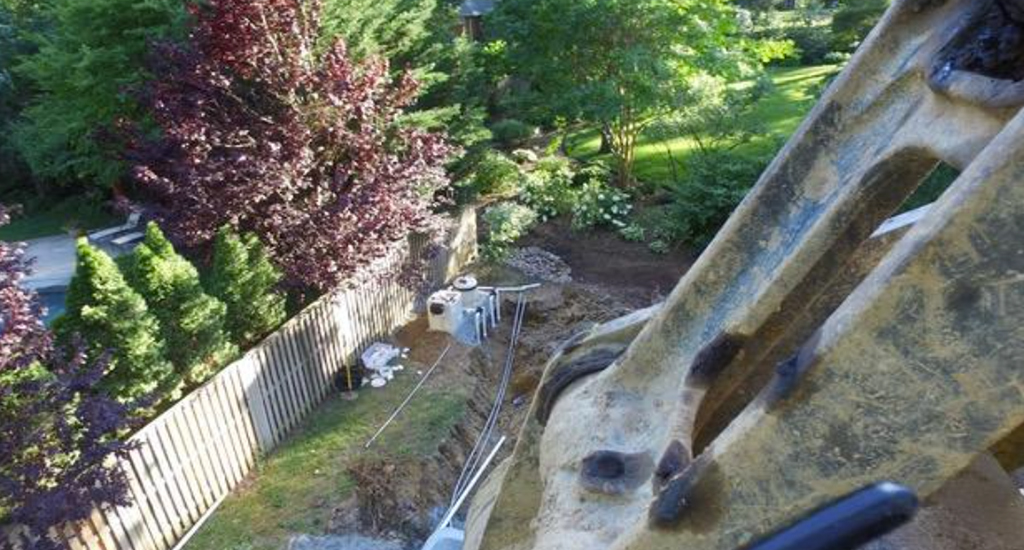
8. Excavation: Digging the Pool with Precision
Excavation is where the project becomes very real. When shell excavation begins, the transformation is dramatic. Lawn disappears and a large hole emerges quickly.
Start Digging According to the Dig Sheet
- Load excavated dirt directly into dump trucks for efficient removal.
- Constantly check and update hash marks as depth increases.
- Carefully follow the dig sheet’s slopes and depth markers.
- Avoid rushing — a few extra minutes of measuring can prevent hours of rework later.
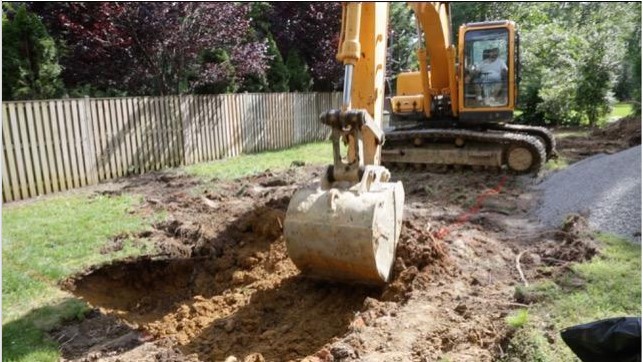
Precision matters throughout. The excavation should typically be approximately 6 inches wider on all sides than the shell dimensions and 2–3 inches deeper than the shell’s depth to accommodate the gravel base. An oversized hole creates backfill problems; an undersized hole means additional excavation after the shell arrives. Experienced contractors use string lines, batter boards, and laser levels to keep dimensions accurate.
Shape the Hole Correctly
The excavation should:
- Be slightly larger than the pool shell to allow for base material and backfill
- Match the floor profile (shallow end, slopes, deep end, etc.)
- Maintain stable, safe side walls
Getting down to grade requires patience — the last few inches should be approached slowly to avoid removing too much material. As the dig nears final depth, contractors switch to more careful digging and frequent laser checks.
Groundwater, unexpected rock, and difficult soil conditions are all variables your contractor should be prepared to address during this phase. Having a plan for each scenario before excavation begins avoids costly delays.
Final Prep After Digging
When excavation is complete, verify:
- Depths at multiple points
- Symmetry and alignment with string lines
- Enough clearance around the shell perimeter
The goal is a clean, flat, and level stone base that matches the dig sheet precisely.
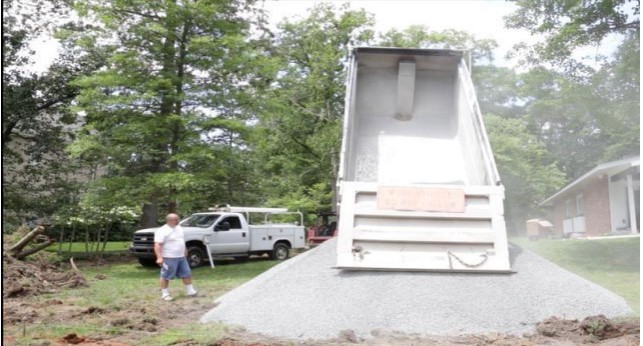
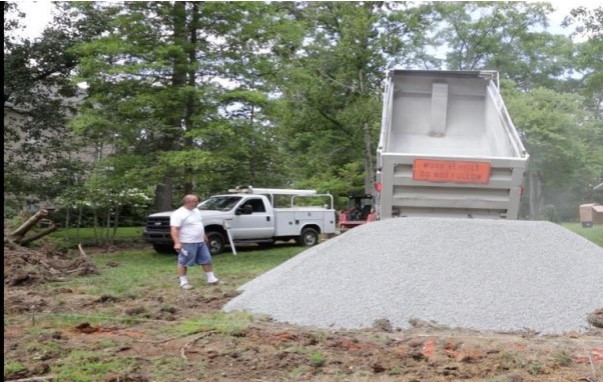
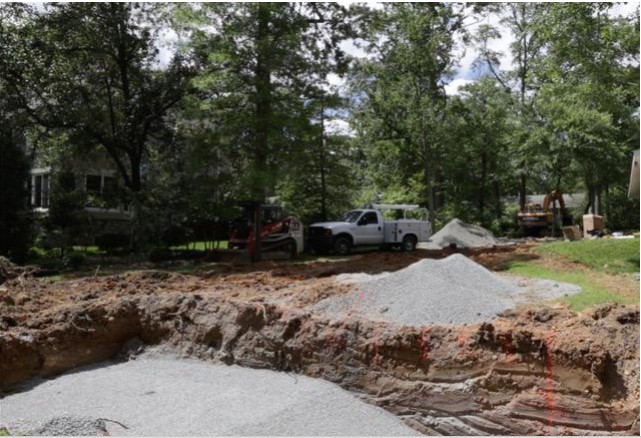
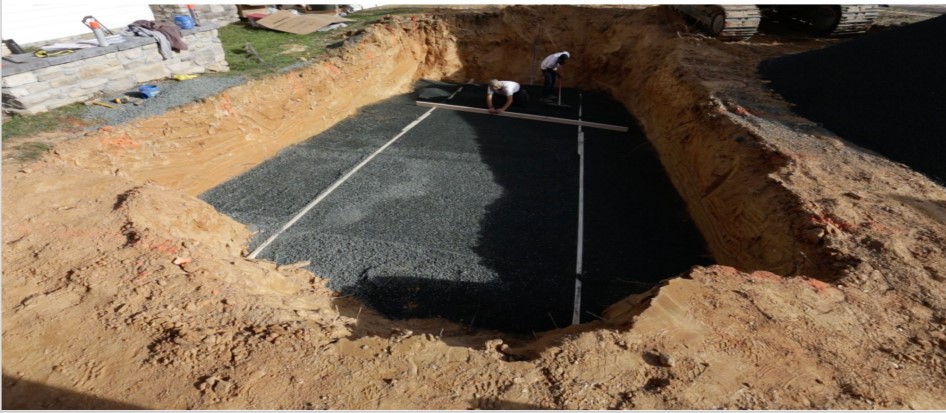
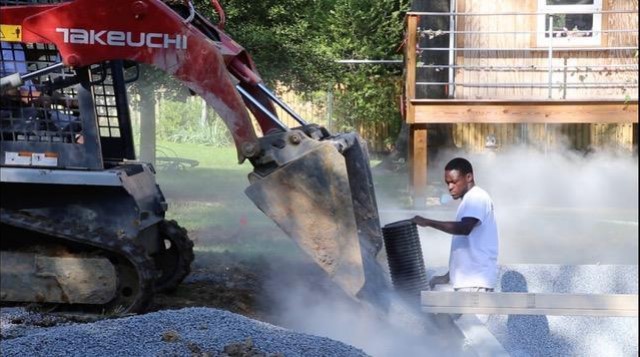
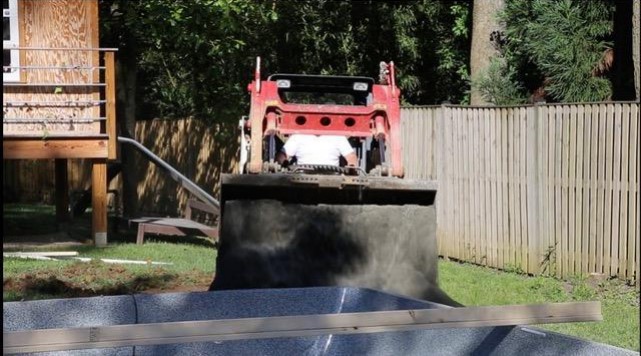
9. Building the Base: Creating a Solid Foundation
The base is what supports the shell’s weight and keeps it level for decades. This is where precision really matters.
Choose the Right Base Material
Industry best practice recommends stone, not sand, for both base and backfill. A typical base consists of a 2–3 inch compacted layer of coarse gravel. Benefits of stone include:
- Excellent drainage
- High compaction
- Reduced risk of shifting or settling
Coarse sand can work in some soil conditions, but gravel drains better and resists shifting — making it the preferred choice in most installations.
Install a Hydrostatic Wellpoint
Best-practice installations use 8″ non-perforated pipe with perforations cut at the bottom to act as a wellpoint. This vertical pipe:
- Allows groundwater to be pumped out
- Relieves hydrostatic pressure under the pool
- Helps prevent the shell from floating in high water table conditions
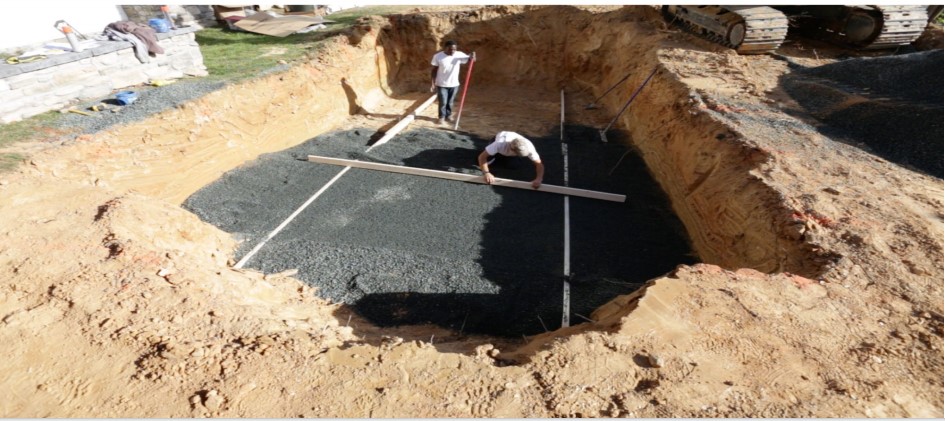
Spread and Screed the Base
- Add stone evenly across the bottom of the excavation.
- Use long 2×4s and a level to screed the stone flat.
- Check the entire footprint, not just a few points.
Contractors carefully screed the base using straight boards and levels to achieve an even, perfectly level surface. Any imperfections here will show up in the pool’s final waterline. Your contractor should verify grade repeatedly during this phase — not just once at the end.
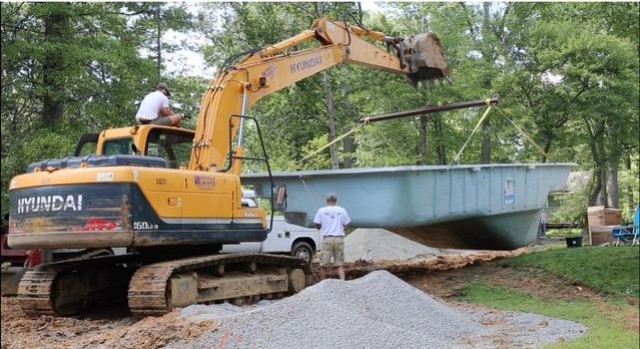
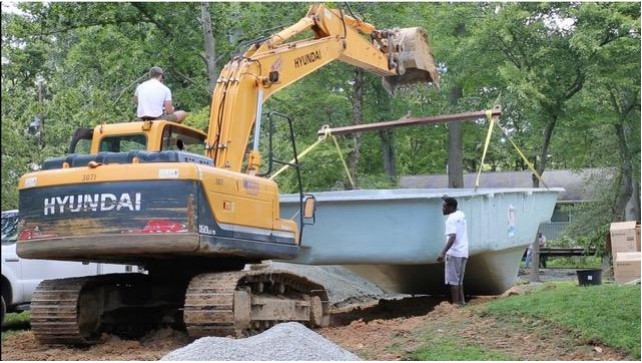
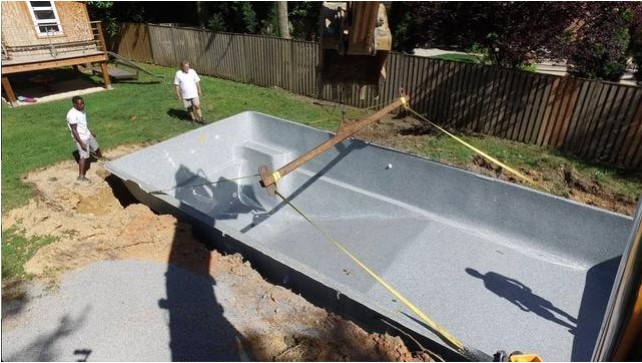
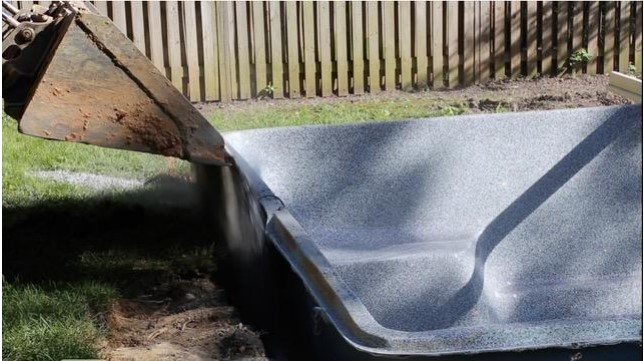
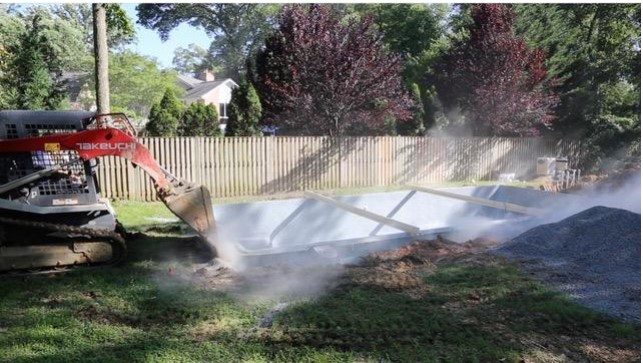
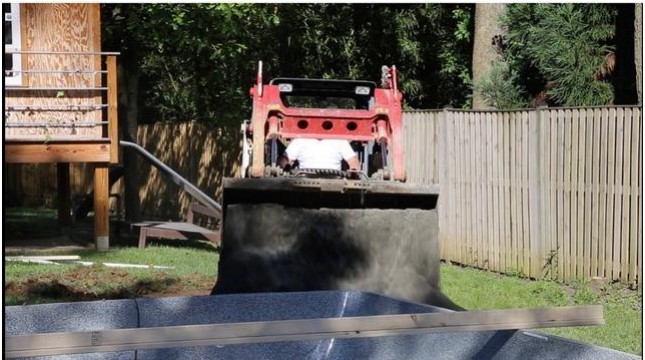
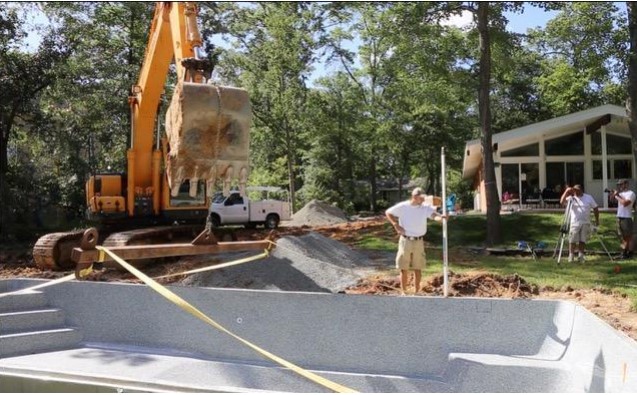
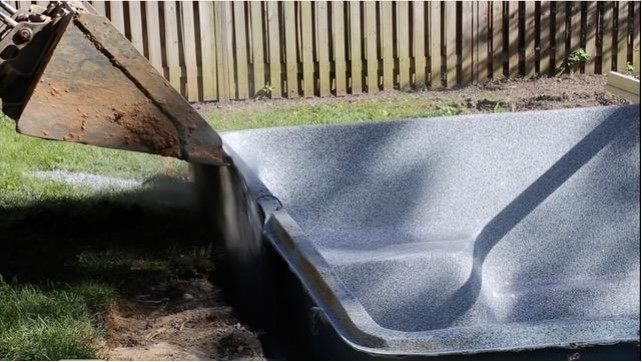
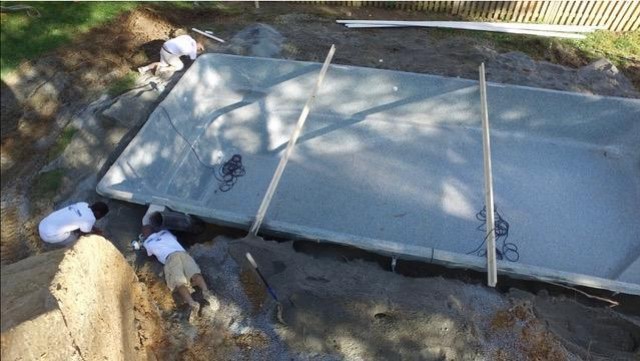
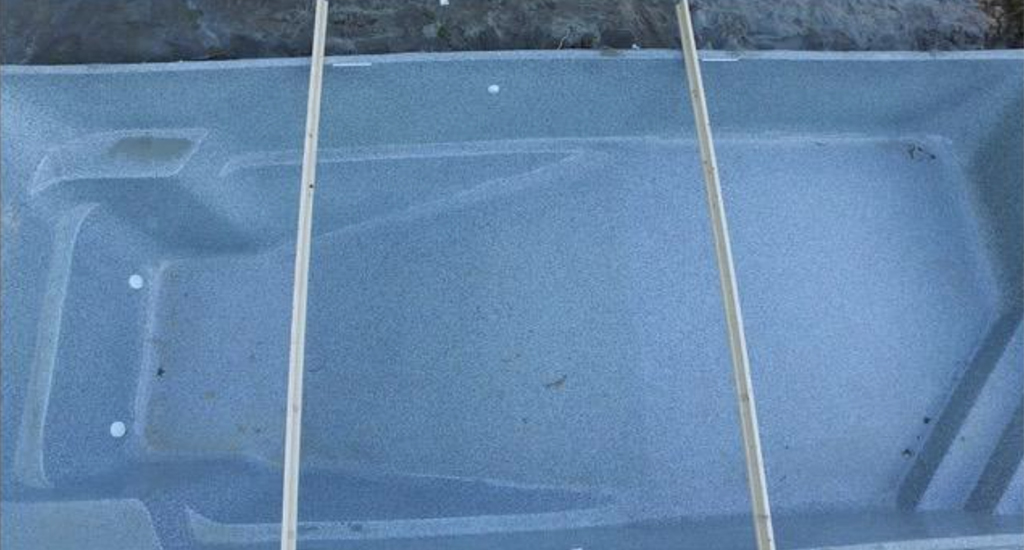
10. Installing the Pool Shell: Setting Your Oasis
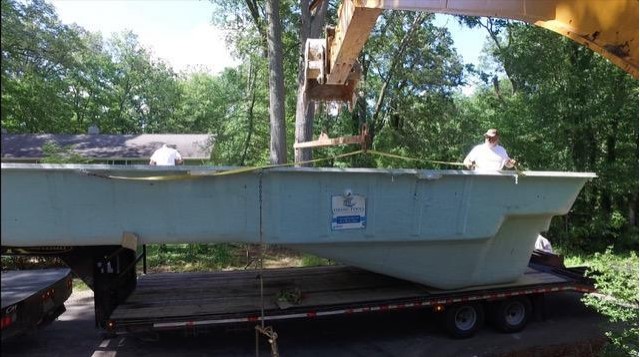
Moving a fiberglass shell is one of the most critical moments of the project. Once the base is ready, it’s time for the most exciting part—setting the shell.
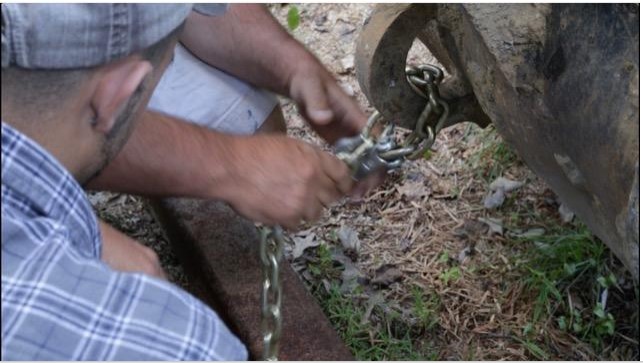
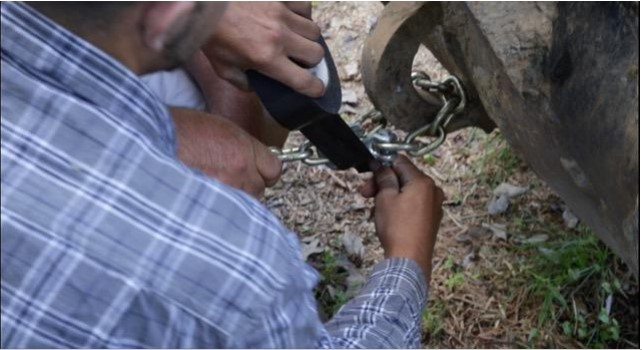
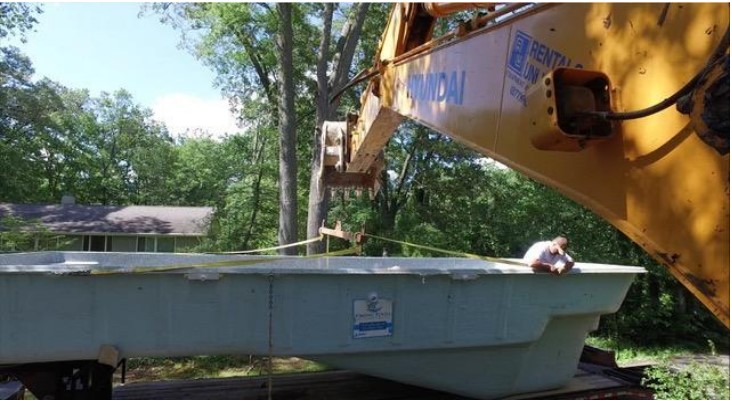
Rigging the Shell
A safe rigging setup uses:
- Chains attached to the excavator bucket — taped for extra precaution
- A spreader bar on the bucket to distribute the load evenly
- Shackles connected to embedded lifting chains on the shell
- Two chains recommended for added security
All connections should be double-checked before lifting begins. The spreader bar ensures that lifting forces are balanced and that the shell does not twist or flex excessively during movement.
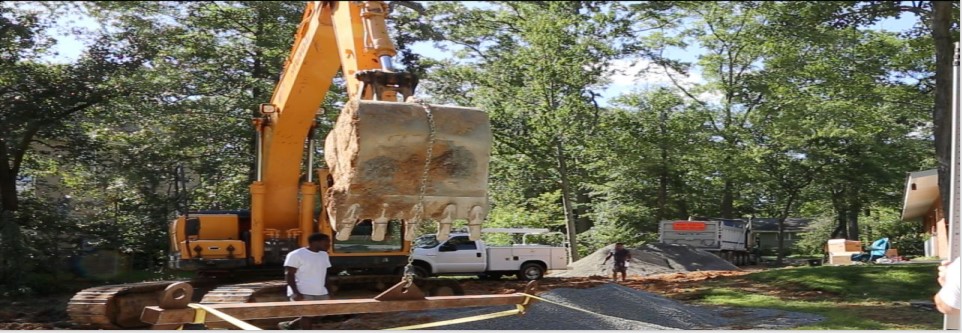
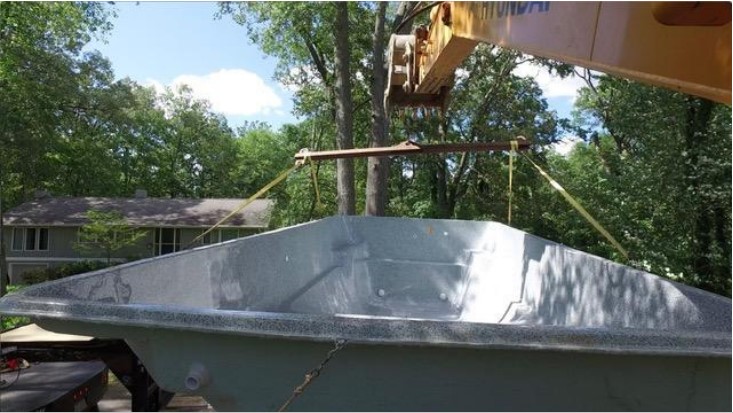
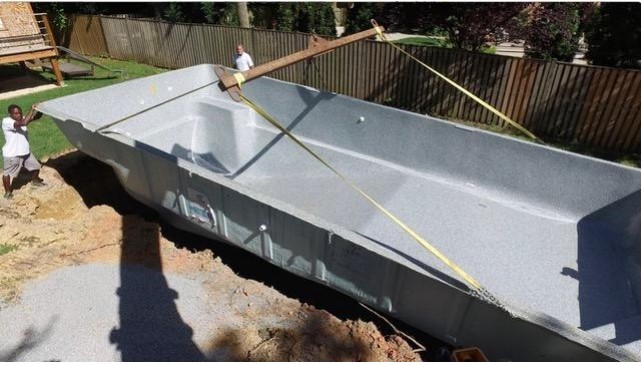
Transporting and Positioning
Because many backyards are tight, the shell is often transported vertically. The process involves:
- Picking up the shell and turning it vertical for transport
- Carefully moving it across the yard with slow, deliberate movements
- Positioning it over the excavation while helpers visually guide alignment
Communication between the equipment operator and spotters on the ground is critical. Clear hand signals or radios should be used so everyone is coordinated throughout the lift and placement.
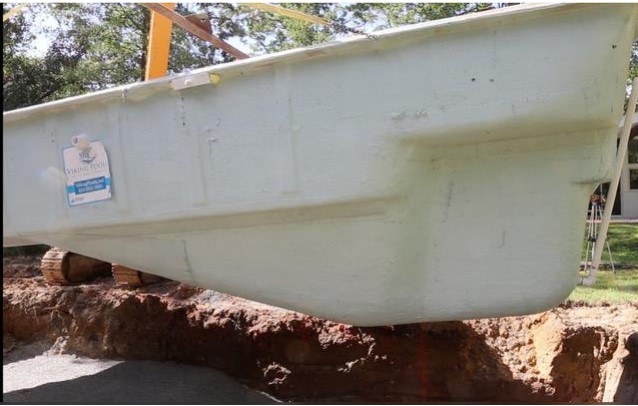
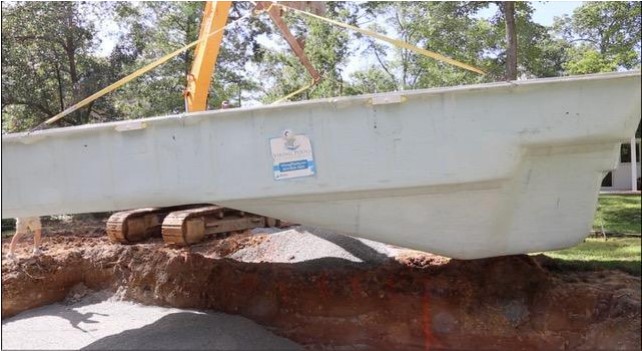
Seating the Shell on the Base
As the shell is set:
- Check the floor for voids — the shell must sit fully on the stone, not hang on straps. Any hollow areas must be corrected immediately by slightly lifting that section and adding stone.
- Verify level front-to-back and side-to-side using long levels or lasers.
- Adjust by adding or redistributing base material if needed.
Level variation should not exceed 1″ over 40′, ensuring a visually level waterline when the pool is filled.
Most installers fill the shell with several inches of water immediately after placement. This adds weight to the shell, preventing it from shifting or floating if groundwater is present while backfilling proceeds.
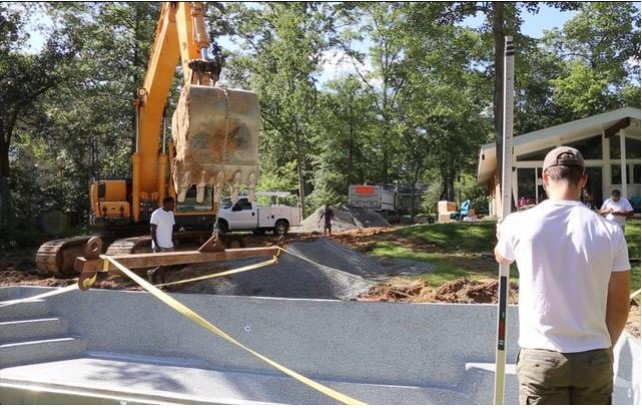
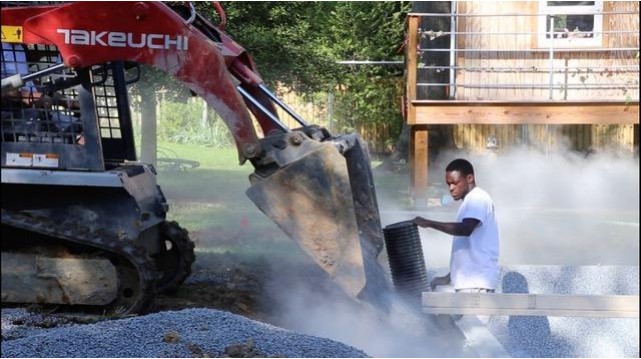
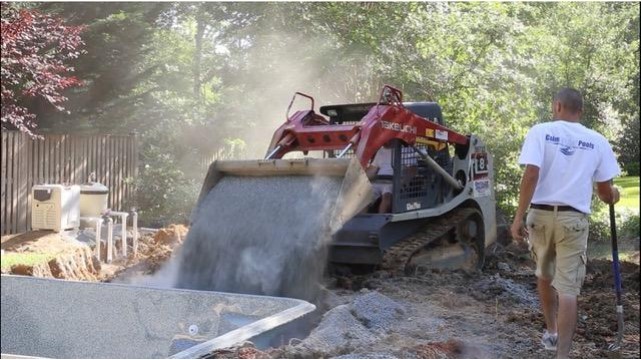
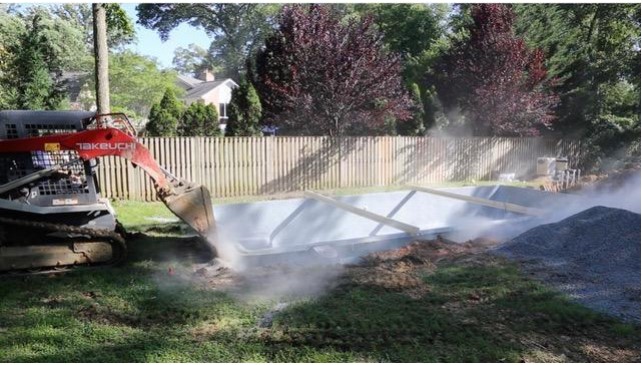
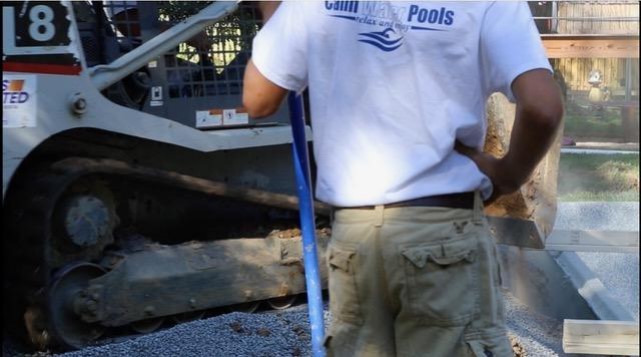
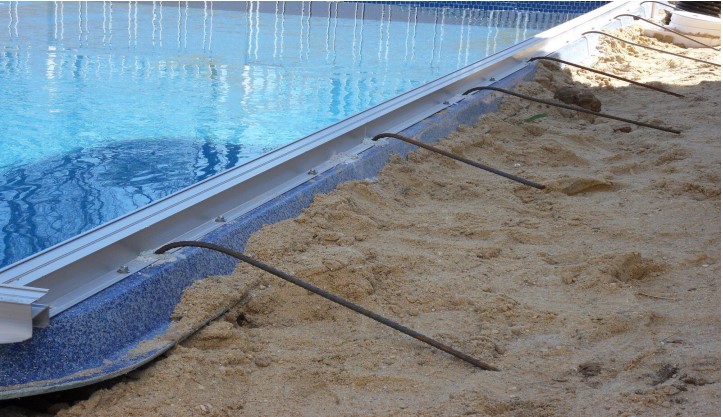
11. Backfilling and Structural Support
The backfill material chosen plays a major role in the long-term performance of the pool. Backfilling supports the pool shell walls and integrates the pool into the surrounding soil.
Use the Right Backfill Material
As noted, stone should be used for backfilling — not sand. Clean, angular stone compacts well, drains effectively, and supports the shell without trapping water against it.
Coordinate Water Level and Backfill
To avoid deforming the shell:
- Fill the pool with water as you backfill
- Keep the water level roughly even with the height of the stone around the outside
- Work in layers, compacting as you go
This balanced approach keeps pressure even between the inside and outside of the pool, protecting the shell structure.
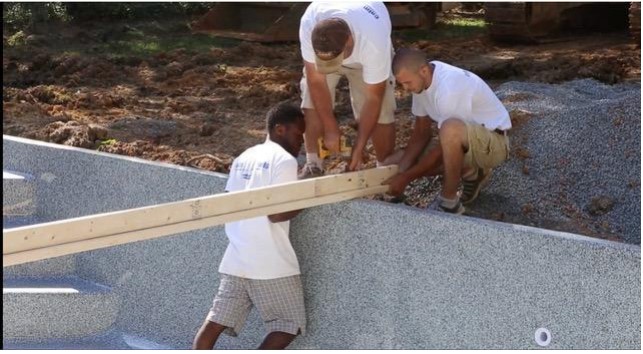
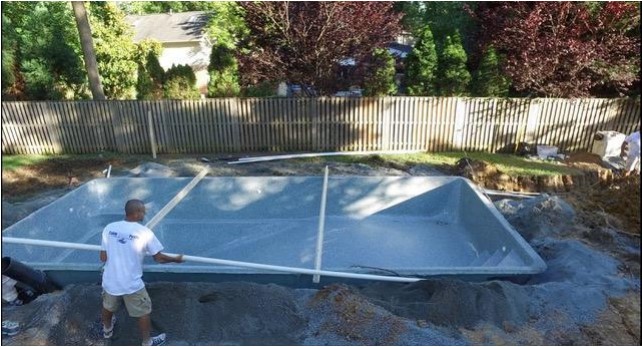
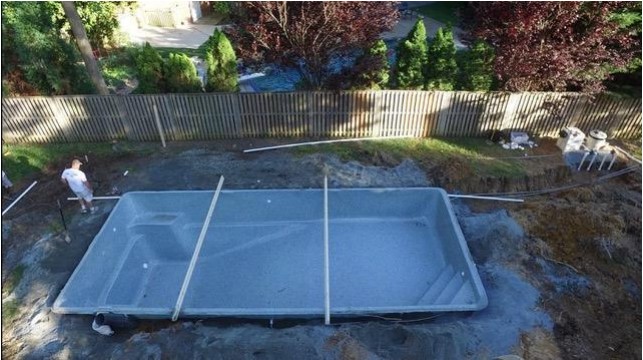
Use T-Boards and Rebar Support
To keep the walls true and square:
- T-boards span the width of the pool to maintain correct width and prevent inward pressure on the walls as stone is added
- Rebar is installed every 3 feet to secure the shell
These supports remain until the surrounding concrete or decking is installed and cured.
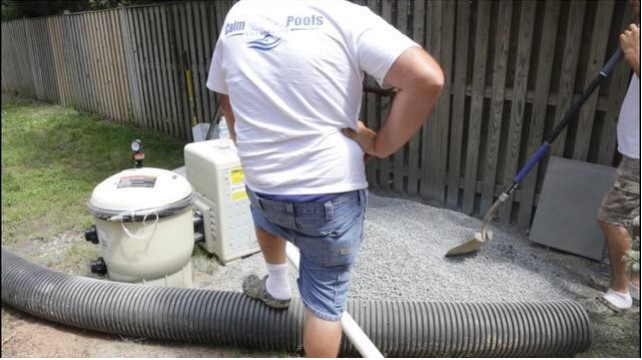
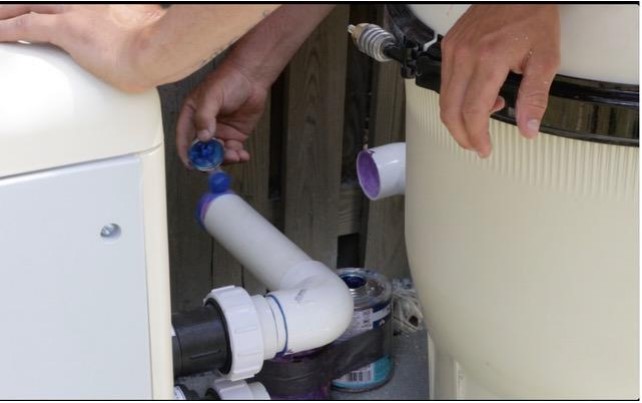
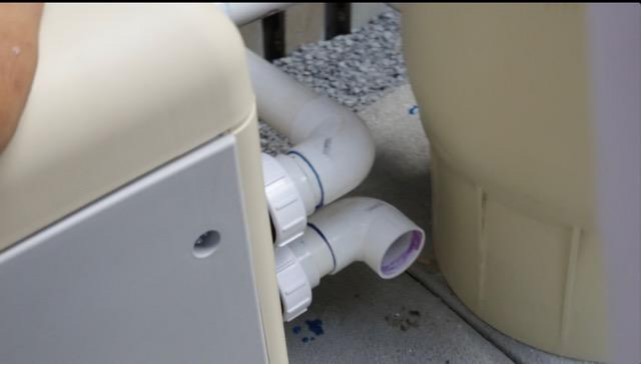
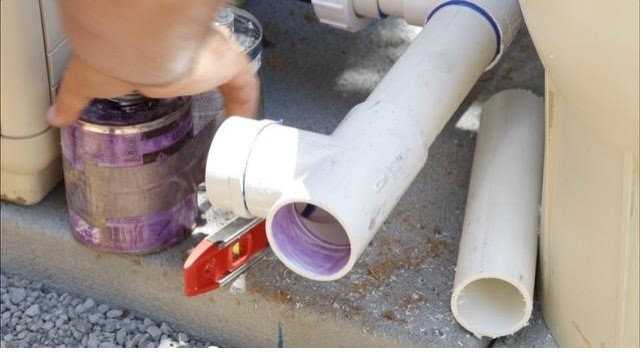
12. Plumbing Layout and Best Practices
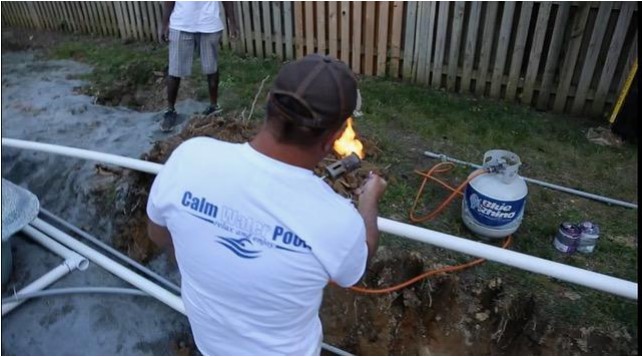
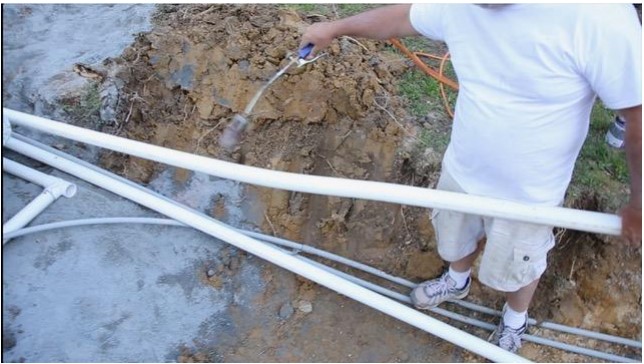
With the shell in place, it’s time to install the circulation system that keeps your pool clean and swimmable. The use of schedule 40 2″ rigid pipe, a propane tank and torch to heat pipes, and heated pipes to eliminate 90° fittings reflects a thoughtful hydraulic approach. Gentle sweeps and minimal tight elbows improve water flow and reduce strain on the pump.
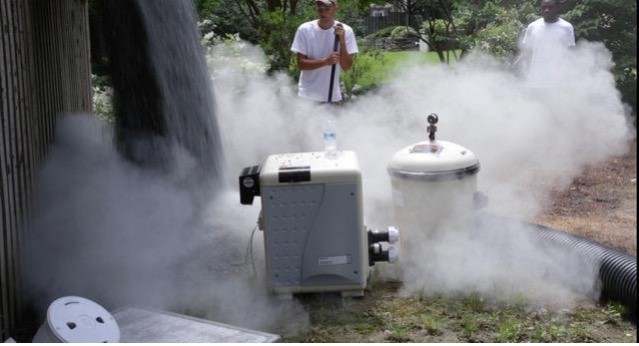
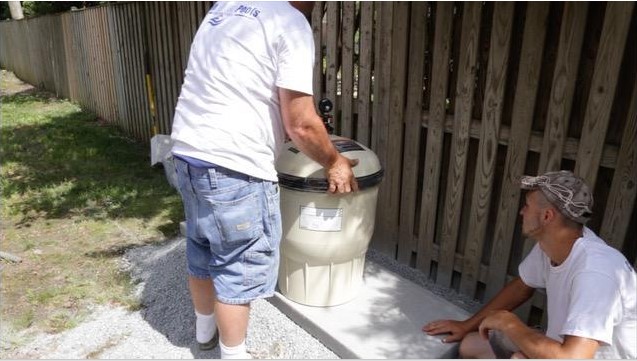
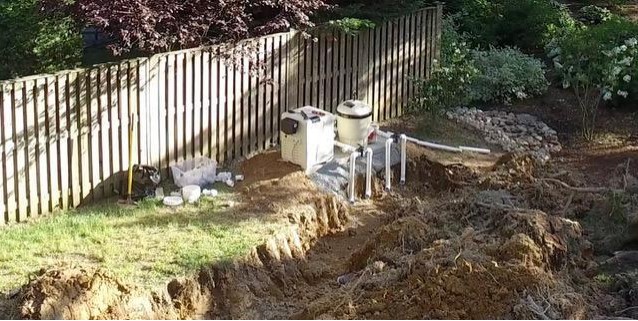
Equipment Pad Setup
Equipment pads are leveled with gravel. AC-style pads are a quick and sturdy solution. Locate the pad:
- Close to the pool — ideally within 25 feet
- Out of the main sightlines if possible
- With proper drainage and access for servicing
On the equipment pad, your contractor will typically install a pool pump, filter, heater, and sanitizer system (such as a salt cell or chlorinator). Once connected, take time to align valves and unions so future maintenance is straightforward.
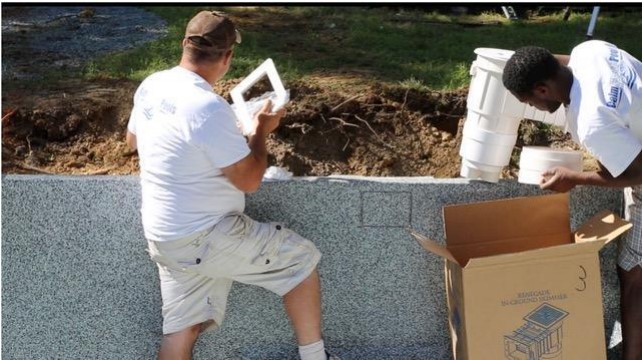
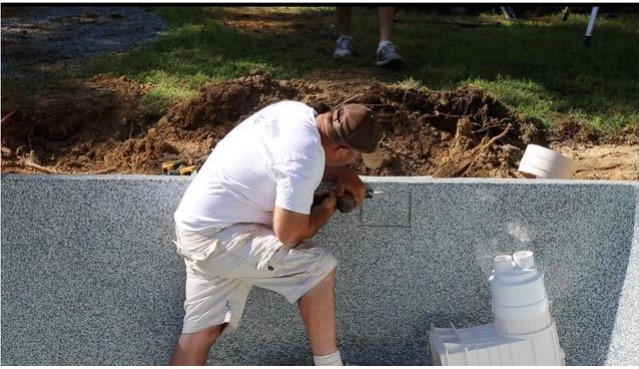
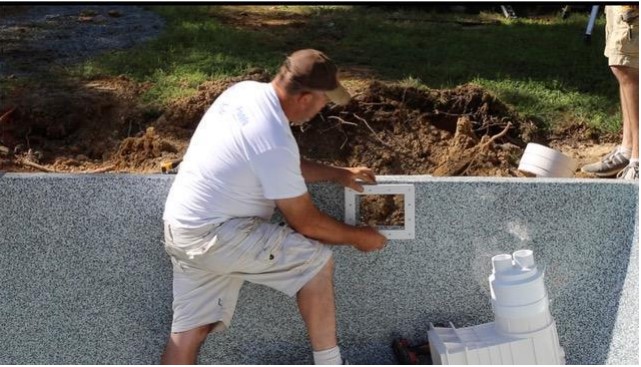
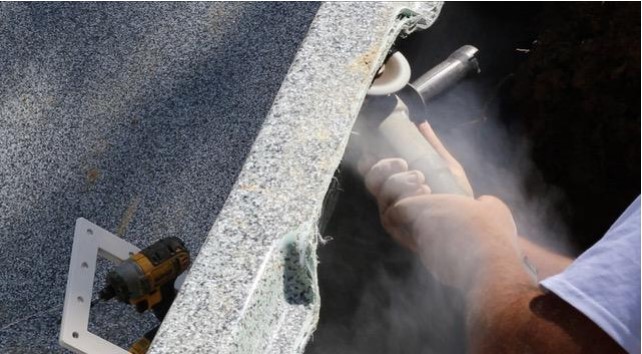
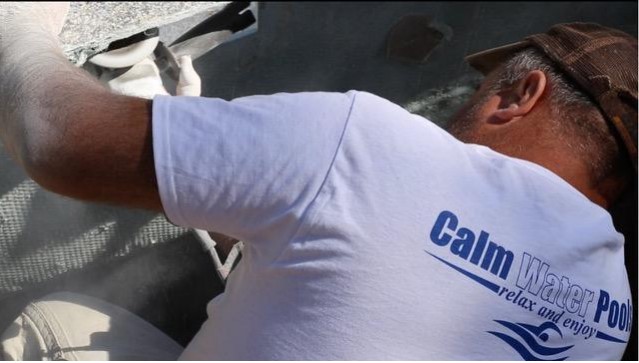
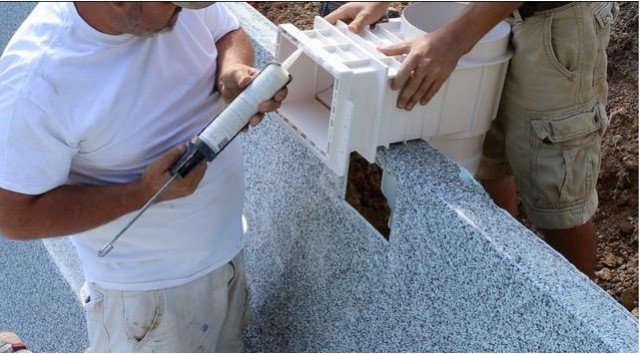
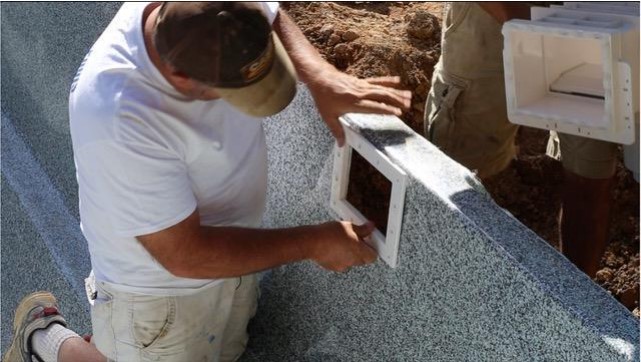
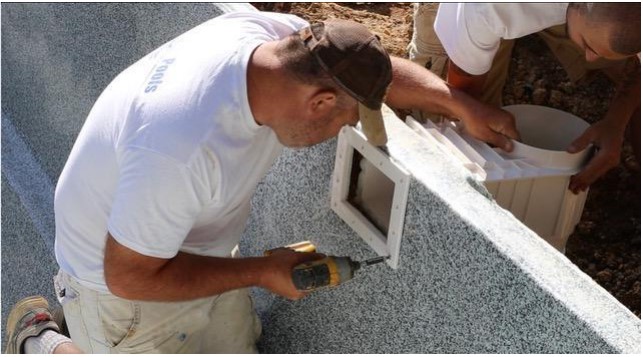
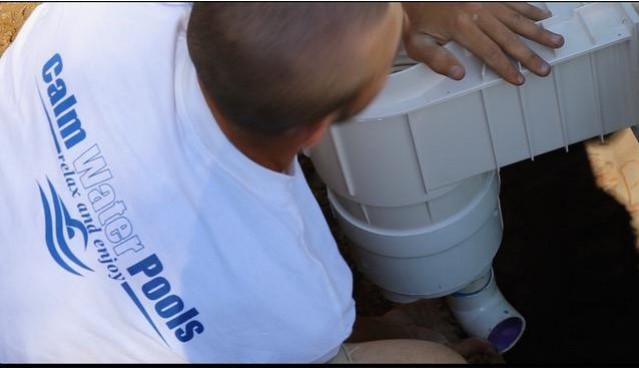
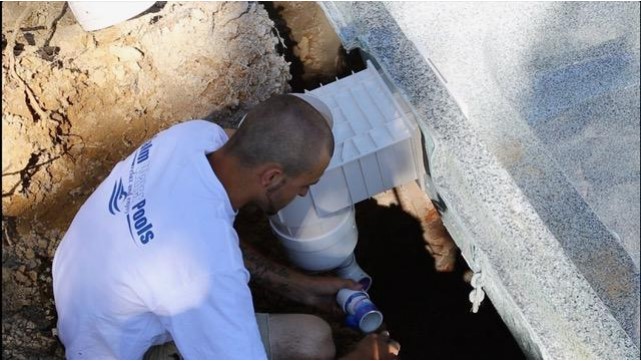
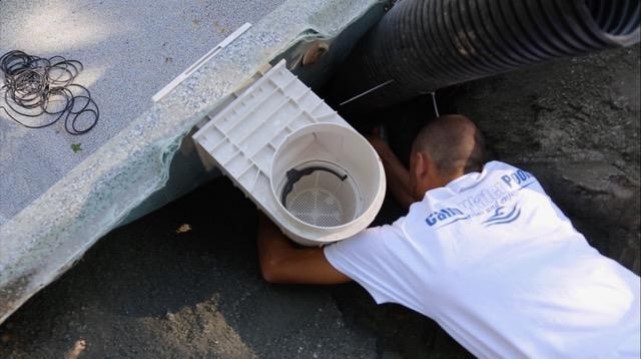
Skimmer Installation
- The skimmer opening is pre-marked on the shell.
- The installer grinds and cuts the opening to match the skimmer body.
- The back side of the shell is ground for proper fit.
- Caulk is applied to the skimmer face.
- The faceplate is screwed into place, compressing the gasket and creating a watertight seal.
- Two bottom ports are present: one typically runs to the pump, the other is capped.
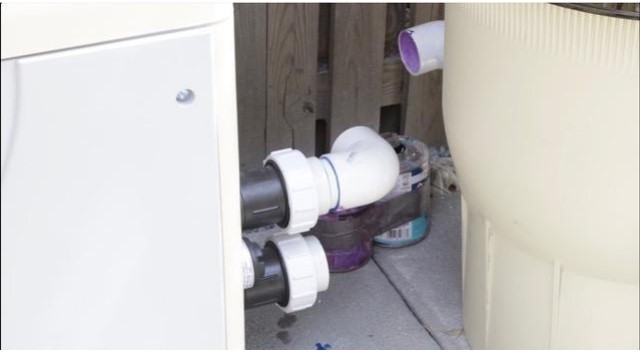
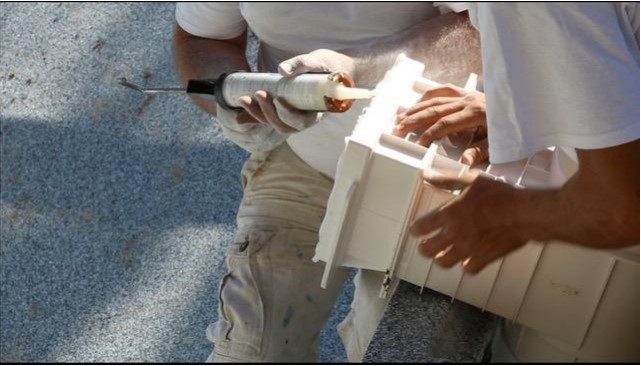
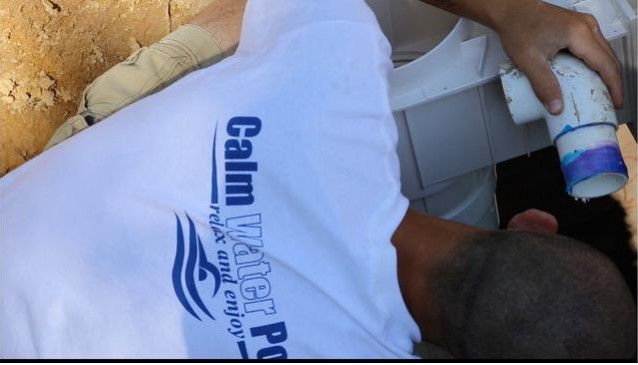
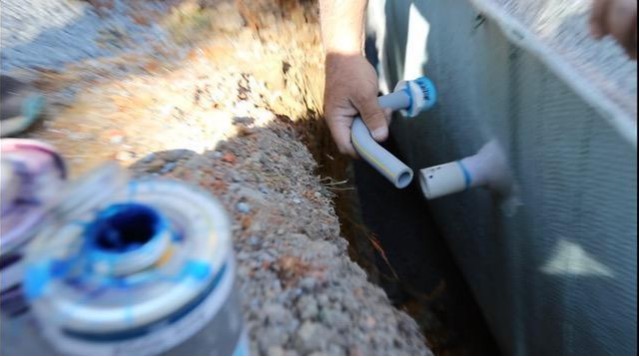
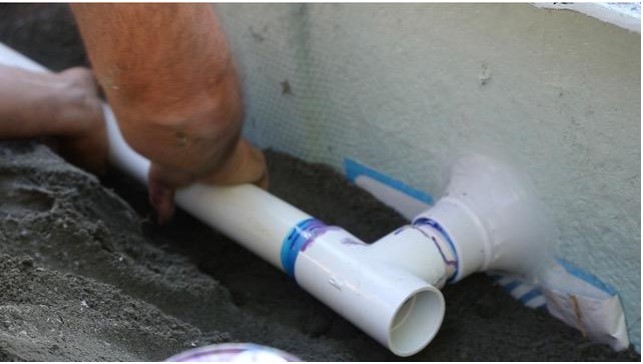
Return Lines and Fittings
Most shells arrive with return fittings already installed at the manufacturer. The contractor will:
- Plumb returns from the equipment pad back to these fittings
- Use 2″ schedule 40 rigid PVC
- Heat pipes with a propane torch to form sweeps instead of sharp 90° elbows when practical, improving water flow and reducing potential leak points
- Install valves as needed for flow control
All suction and return lines should be clearly labeled. Keep plumbing runs to no more than 25′ from the shell when possible to maintain efficient circulation.
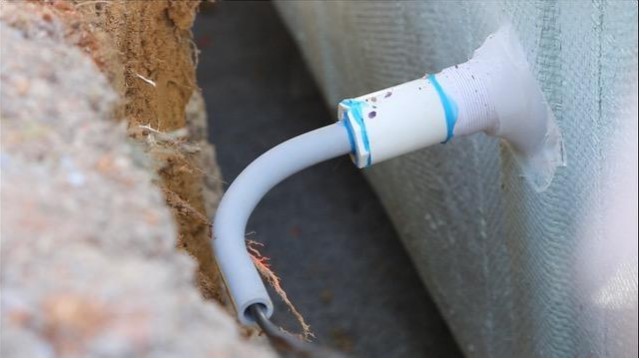
Pool Light Plumbing
- Light fixtures are installed at the factory.
- On-site installation includes the coupling and 90° fitting at the back of the light niche — 3 pieces total.
- Conduit is run back to the junction box or transformer following electrical code.
Pressure Testing
Before backfilling fully, contractors should:
- Pressure test all plumbing
- Inspect all joints for leaks
- Confirm pump and filter connections are tight
Catching issues now is far easier than after the deck is poured.
13. Equipment Pad, System Setup & Equipment Selection
Neat and accessible plumbing pays off every time the pool needs to be winterized, opened in spring, or have equipment serviced. The skimmer location on the side wall for the auto cover should be coordinated early so that cover tracks, skimmer height, and coping all work together.
Once the pool heater, filter, pump, and sanitizer are ready to be connected, take time to align valves and unions so that future maintenance is straightforward. The equipment list typically includes:
- Pool pump — sized correctly for the pool volume and hydraulic layout
- Filter — cartridge, sand, or DE, selected based on maintenance preferences
- Heater — plumbed and connected to extend the swimming season
- Sanitizer system — such as a saltwater chlorine generator or tablet feeder
Making Smart Equipment Choices
Your pool equipment choices have a bigger impact on long-term costs and enjoyment than most homeowners realize at the time of installation. A few decisions worth careful consideration:
- Variable-speed pumps: These cost more upfront but can reduce electricity costs by 50–70% compared to a single-speed pump over their lifespan. They also run quieter and qualify for utility rebates in some areas.
- Cartridge vs. sand filters: Cartridge filters require less backwashing and produce less water waste than sand filters in most residential applications — an advantage both for convenience and water conservation.
- Automation systems: Systems that allow you to control pump schedules, lighting, and heating from a smartphone are increasingly affordable. Even if you don’t install them immediately, it’s worth planning conduit and wiring during the build so adding automation later is straightforward.
We’re happy to walk through equipment options with you during the shell selection process so your contractor can quote accordingly.
14. Finishing Touches: Decks, Coping, Lighting & Landscaping
After the shell is ready for water — typically the next day — the focus shifts to shaping the outdoor living space around the new pool.
Decking Options
You can choose from:
- Pavers: Flexible, easy to repair, and attractive.
- Stamped Concrete: Many patterns and colors, typically lower initial cost.
- Natural Stone (e.g., travertine): Premium, timeless look with excellent durability.
- Composite Decking: Warm, modern feel with low maintenance.
Match the style of your home and consider heat absorption, slip resistance, and maintenance. Expansion joints and drainage must be properly planned.
Coping
Coping forms the border around the pool edge and protects both the shell and the deck interface. Popular choices include:
- Precast concrete coping
- Travertine or natural stone coping
- Cantilevered concrete (using special forms)
Good coping ties the entire design together visually and functionally. Ensure the surrounding deck slopes approximately 1/4 inch per foot away from the pool — this prevents water from draining back toward the shell and causing chemical imbalance over time.
Lighting
Fiberglass shells frequently include integrated light niches. Adding LED pool lights:
- Extends usable hours into the evening
- Improves safety
- Creates a resort-like ambiance
You can also add landscape lighting around plants, steps, or pathways for a cohesive nighttime effect. Walking around the pool at night with the lights on is also a good way to confirm visibility and illumination meet expectations.
Pool Startup
Once the pool is filled completely, water chemistry must be established before swimming begins. pH, alkalinity, calcium hardness, and sanitizer levels all need to be set in a specific order — getting this sequence right protects the gelcoat surface and ensures the water is safe and balanced from the start. Your contractor or a local pool service professional can handle startup if needed.
Landscaping
Thoughtful landscaping completes the retreat:
- Use low-litter plants that won’t constantly drop leaves into the pool.
- Consider privacy hedges or fences.
- Add seating areas, fire pits, or outdoor kitchens nearby.
- Add mulch beds and low-voltage lighting to soften hard edges and make evenings around the pool feel inviting.
Keep large root systems and invasive plants away from the pool structure.
15. Maintenance & Care: Keeping Your Pool in Top Shape
Maintaining a fiberglass pool is straightforward. Because fiberglass surfaces are non-porous, they resist algae growth and staining better than many other pool types. With modest effort and consistent water balance, a fiberglass pool will maintain its glossy look for many years.
Routine Cleaning
- Skim leaves and debris
- Empty skimmer and pump baskets
- Brush steps, ledges, and walls occasionally
- Vacuum the floor (or use a robotic cleaner)
Water Chemistry
Maintain balanced water to protect swimmers and equipment. Check at least weekly during the swim season. Fiberglass surfaces are sensitive to low pH — consistently acidic water can damage the gelcoat over time. Target ranges:
- pH: 7.2–7.6
- Free chlorine: 1–3 ppm
- Total alkalinity: 80–120 ppm
- Calcium hardness: per manufacturer’s recommendation
Filtration
Run your pump long enough to turn over the full pool volume at least once per day. Variable-speed pumps make it economical to run longer at lower speeds, which improves filtration without significantly increasing your electricity bill — giving you cleaner water at a lower operating cost.
Monthly Checks
- Inspect filters
- Examine fittings for slow drips
- Verify that the pump is primed and free of air leaks
Surface Care
Fiberglass doesn’t need to be painted or resurfaced the way plaster pools do, but the gelcoat benefits from periodic application of a fiberglass-specific pool polish. This maintains its luster, resists staining, and extends the life of the surface finish over years of use.
Seasonal Care
Before colder months, clean the pool thoroughly, balance the water, lower the water level if required by the cover system, add winterizing chemicals, and install Inground Pool Winter Safety Covers to protect both the pool and family members. In warm climates, your off-season may be very short, but covering still reduces debris and chemical use.
Minor Repairs
Fiberglass is tough, but occasional chips, scrapes, or surface dulling can occur over many years. Fortunately:
- Gelcoat repair kits can address small damage
- Polishing can restore shine in faded areas
Compared to re-plastering concrete or replacing a vinyl liner, fiberglass repair is relatively simple and affordable.
16. Cost & Budgeting Considerations
Fiberglass pools often cost far less over the long term than concrete alternatives, thanks to lower maintenance demands and faster installation.
Typical cost categories include:
- Fiberglass pool shell (manufactured by Latham Pool Products)
- Delivery and crane/excavator time
- Excavation and soil removal
- Stone for base and backfill
- Plumbing and equipment (pump, filter, heater, sanitizer, lights)
- Electrical work (performed by a licensed electrician)
- Decking and coping
- Landscaping
- Contractor labor for installation
Plan a realistic budget, then add a contingency of 10–15% for surprises such as extra stone, added drainage, or minor design changes.
17. Why Work With Calmwater Pools for Shell Selection & Procurement
Homeowners in Maryland, Washington DC, Northern Virginia, and nearby West Virginia have no shortage of options when it comes to starting a pool project. So why work with Calmwater Pools? The answer comes down to three things: local knowledge, process expertise, and a clearly defined scope that protects you.
We Know This Region
Fiberglass pool shell selection isn’t a one-size-fits-all exercise. The right model for a flat suburban lot in Northern Virginia may be entirely different from what works on a sloped, wooded property in western Maryland or a narrow backyard in DC. Regional factors matter:
- Soil conditions: Clay-heavy soils common in parts of Maryland and Northern Virginia affect drainage design and backfill choices, which in turn influence which shell profiles and depths are best suited to a given site.
- Water table: Higher water table areas—particularly near the Potomac or in low-lying parts of DC and Northern Virginia—require hydrostatic planning that factors into shell selection and base design.
- Lot geometry: Urban and close-in suburban lots often have tight access, overhead obstructions, or unusual dimensions that constrain shell sizing and delivery logistics. We understand these constraints and plan accordingly.
- Local permitting: While Calmwater Pools does not pull permits on your behalf, we’re familiar with the general permitting landscape across our service area and can help you understand what to expect before you begin.
We Specialize in the Part That Matters First
Many contractors and pool companies lead with installation and treat shell selection as an afterthought. Calmwater Pools takes the opposite view. The shell is the pool. Every other decision—excavation depth, equipment placement, deck design, coping style—flows from which shell you choose. Getting this decision right at the outset prevents costly mismatches later.
- Helping you identify the right fiberglass pool shell model for your specific site and lifestyle
- Confirming that your selection is actually available and appropriate for your timeline
- Managing procurement so the shell is ordered correctly and on schedule
- Coordinating delivery so it arrives when your contractor is ready—not before, not after
You Stay in Control
One of the advantages of working with Calmwater Pools is that you remain the decision-maker throughout. We provide guidance, information, and logistics support—but you hire your own contractors, manage your own project timeline, and make your own choices about decking, equipment, landscaping, and finishing details.
This structure gives you flexibility to:
- Source competitive bids from multiple installation contractors
- Hire specialists for specific scopes (excavation, plumbing, electrical, hardscape) rather than relying on a single general contractor
- Move at your own pace without being locked into a bundled package that includes services you may not need
You own the project. We help you get the foundation—the shell itself—right.
Quality Shells, Locally Coordinated
The fiberglass pool shells we help homeowners procure are manufactured by Latham Pool Products. These shells are built to exacting standards with durable gelcoat finishes, structural fiberglass layering, and factory-installed features including steps, benches, sun ledges, and light niches. Working with Calmwater Pools means you get local coordination—someone who knows the delivery routes, the site considerations, and the contractor landscape in Maryland, DC, Northern Virginia, and nearby West Virginia.
A Straightforward, Honest Process
We don’t oversell, and we don’t bundle services we can’t deliver. Our role is specific: help you select the right shell, coordinate its procurement, and get it delivered to your site on time and in good condition. If you’re a homeowner in Maryland, Washington DC, Northern Virginia, or nearby West Virginia considering a fiberglass inground pool, the best first step is a conversation about which shell is right for your project. That’s exactly what we’re here for.
18. Common Installation Mistakes (and How to Avoid Them)
Even experienced contractors can get tripped up by a few recurring issues. Awareness of these common pitfalls helps homeowners work more effectively with their teams:
- Rushing Excavation: An inaccurate dig is one of the main causes of long-term issues. Solution: measure frequently, follow the dig sheet, and take your time.
- Using the Wrong Backfill (like Sand): Sand can trap water and lead to shifting. Solution: use stone as recommended by industry best practice.
- Inadequate Base Leveling: An uneven base causes long-term settling and waterline problems. Solution: screed carefully with long boards and a level; don’t accept “close enough.”
- Not Coordinating Water Fill with Backfill: Unequal pressure can deform the shell. Solution: raise water and backfill levels together.
- Skipping Plumbing Pressure Tests: Leaks found after decking is poured are far more expensive to fix. Solution: test all lines before backfilling fully or pouring any concrete.
- Overcomplicating Plumbing: Too many unnecessary valves, tight 90° turns, or undersized pipe creates long-term headaches. Solution: keep layouts simple and efficient.
- Ignoring Local Codes: Skipping inspections can result in fines or forced rework. Solution: pull permits and follow safety and electrical codes from the start.
19. Sample Timeline for Installation
While every project is different, here is a general timeline for a typical fiberglass pool shell installation:
- Week 1–2: Planning, permits, pool shell selection with Calmwater Pools, and scheduling contractors and equipment.
- Day 1: Site clearing, rough grading, setting stakes, marking layout, utilities located, stumps removed, grade checked.
- Day 2: Excavation and soil removal.
- Day 3: Base stone installed and screeded.
- Day 4: Shell delivery, rigging, and setting; initial backfill and water added.
- Day 5–6: Plumbing, equipment pad setup, additional backfill, and electrical work by a licensed electrician.
- Day 7–10: Finish backfilling, equipment hookup, and testing. Coping, decking formwork, and concrete pour or paver installation.
- Following Weeks: Final connections, water balance, site cleanup, decking, coping, landscaping, and final touches.
Some projects may stretch across several weeks depending on contractor schedules and permit timelines. The efficiency of a fiberglass shell makes it adaptable to a wide range of project plans and budgets.
20. Frequently Asked Questions: Fiberglass Pool Shell Selection, Procurement & Delivery
Homeowners new to the fiberglass pool process often arrive with a lot of questions—and rightfully so. This is a significant investment, and the shell selection and procurement phase sets the tone for everything that follows. Below are the questions we hear most often, answered plainly.
What does Calmwater Pools actually do?
Calmwater Pools helps homeowners in Maryland, Washington DC, Northern Virginia, and nearby West Virginia select the right fiberglass pool shell model, coordinates procurement of that shell, and arranges delivery to the project site. We do not install pools, provide contractors, or supervise any construction work. All excavation, plumbing, electrical, and finishing work is performed by qualified independent contractors hired directly by the homeowner.
Who manufactures the fiberglass pool shells?
The fiberglass pool shells we help homeowners procure are manufactured by Latham Pool Products.
How do I know which fiberglass pool shell model is right for my yard?
Shell selection depends on several factors: the dimensions and shape of your available space, your yard’s access for delivery and excavation equipment, your household’s usage preferences (lap swimming, family recreation, relaxing, entertaining), depth requirements, and aesthetic goals. We work through these factors with you during the selection process to identify models that are genuinely compatible with your project—not just what looks good in a catalog.
Do I need to hire a contractor before selecting a shell?
Not necessarily, but it helps to have at least a preliminary conversation with a contractor before finalizing your shell choice. Your contractor can assess site access, soil conditions, and any grading constraints that might affect which shell dimensions are practical. Ideally, shell selection and contractor engagement happen in parallel so that the dig sheet can be shared with your contractor before excavation planning begins.
What is a dig sheet and why does it matter?
A dig sheet is a technical document provided by the shell manufacturer that specifies the exact excavation dimensions required for a given pool model—including length, width, depth at various points, floor slope profiles, and corner radii. Your excavation contractor works directly from the dig sheet to ensure the hole matches the shell. An incorrect excavation can require rework, cause leveling problems, or result in an unstable installation. We make sure your contractor has the dig sheet before any ground is broken.
How long does fiberglass pool shell procurement take?
Lead times vary depending on the model, color selection, and time of year. Pool season (spring and early summer) typically sees higher demand and longer lead times. We confirm availability and communicate realistic timelines upfront so you can plan your contractor schedule and excavation timing accordingly. Starting the procurement conversation early—ideally several months before your intended installation window—gives you the most flexibility.
What are the delivery logistics for a fiberglass pool shell?
Fiberglass pool shells are large, one-piece structures transported on flatbed trucks or specialized trailers. Successful delivery requires adequate road and driveway access, clearance for overhead obstructions (power lines, tree branches, roof overhangs), enough space for the truck to maneuver, and an excavator or crane on-site to offload and position the shell. We coordinate delivery timing and communicate logistics requirements to you and your contractor in advance so delivery day goes smoothly.
Can the shell be delivered if my driveway or access is tight?
Sometimes yes, sometimes no—it depends on the specific dimensions of your access route and the shell you’ve selected. We assess access as part of the pre-delivery planning process and discuss any constraints with you before the delivery is scheduled. In some cases, a smaller shell model may be a better fit for tight-access properties. We’d rather surface this issue during planning than on delivery day.
Does the fiberglass shell come with built-in steps, benches, or ledges?
Yes. Fiberglass pool shells manufactured by Latham Pool Products include factory-molded features such as entry steps, bench seating, sun ledges (tanning ledges), and light niches, depending on the model. These features are permanently integrated into the shell structure—they’re not add-ons installed on-site. The specific features available vary by model, which is part of why the selection process matters.
What gelcoat colors are available?
Color availability varies by model. Gelcoat color affects the perceived water color of your finished pool—lighter colors tend to produce a bright aqua appearance, while darker colors create a deeper blue or green effect. We walk through color options with you during the selection process so you can visualize the finished result before committing.
What warranty comes with the shell?
Warranty terms are determined by Latham Pool Products as the manufacturer. We provide warranty documentation with your shell and can answer general questions about coverage, but warranty claims are handled directly between the homeowner and the manufacturer.
Do you serve areas outside of Maryland, DC, Northern Virginia, and nearby West Virginia?
No. Calmwater Pools’ service area is limited to Maryland, Washington DC, Northern Virginia, and nearby West Virginia. If your project is outside this area, we’re not the right fit—but we’re happy to point you in the right direction.
How do I get started?
The best first step is a conversation. Contact Calmwater Pools to discuss your project, your yard, and your goals. From there, we can walk you through shell selection options, confirm availability, and begin coordinating the procurement and delivery process. The earlier you reach out—especially if you’re targeting a specific installation season—the smoother the process will be.
21. Quick Checklists & Final Thoughts
Pre-Excavation Checklist
- Permits obtained
- 811 called and all underground utilities located
- Dig sheet understood by contractor
- Equipment access confirmed
- Dump sites arranged (haul-away or on-site regrading plan in place)
- Pool shell delivery date coordinated with Calmwater Pools
- All contractors scheduled and confirmed
Before Setting the Shell
- Excavation matches dig sheet
- Base stone installed and screeded (2–3 inch compacted layer)
- Wellpoint installed
- Site clear for machinery and crew
Before Backfilling Fully
- Shell level and aligned
- Shell filled with water immediately after placement
- Plumbing installed and pressure-tested
- Equipment pad in place
- T-boards and rebar support installed
Final Thoughts
A fiberglass pool shell installation is a substantial project that becomes very manageable when broken down into clear, well-coordinated steps—planning, excavation, base preparation, shell placement, plumbing, backfilling, and finishing. A fiberglass pool shell is one of the most rewarding investments a homeowner can make—bringing lasting enjoyment, increased property value, and a beautiful backyard retreat for the whole family.
Calmwater Pools is here to help homeowners in Maryland, Washington DC, Northern Virginia, and nearby West Virginia navigate the selection and procurement process with confidence. The fiberglass pool shells we help you procure are manufactured by Latham Pool Products and delivered directly to your project site.
With the right shell, the right contractors, and thoughtful planning, you’ll be rewarded with:
- A beautiful inground fiberglass pool
- Lower long-term maintenance costs
- A backyard oasis you and your family will enjoy for many years
You can also explore our Full-Service Pool Installation option, where an experienced team manages the complete process. Contact Calmwater Pools today to start the conversation about which fiberglass pool model is right for your yard.